
Documentation
Hardware
What's in the box?
In the keyboard box:
- Flux Keyboard x 1
- USB-C to USB-C cable x 1
- USB-C to USB-A (data) + USB-C (power) cable x 1
- USB-A female to USB-C male adapter x 1
- Quick start card x 1
- Active module notice card x 1
- Safety, warranty and regulatory information card x 1
- Thank you card x1
In the keyframe box:
- Keyframe in ANSI or ISO layout with tactile or linear feel x1
- Keyframe handling and maintenance card x1
In the module box:
- 1S passive module in black or frosted x1
- 2S passive module in black or frosted x1
- 3S passive module in black or frosted x1
Attaching your keyframe and passive modules
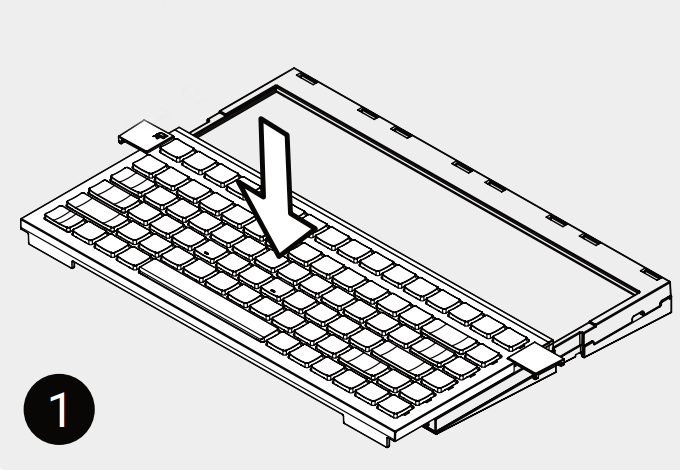
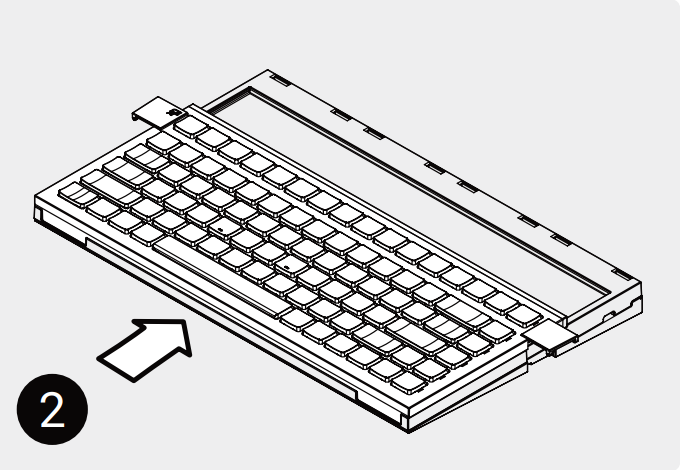
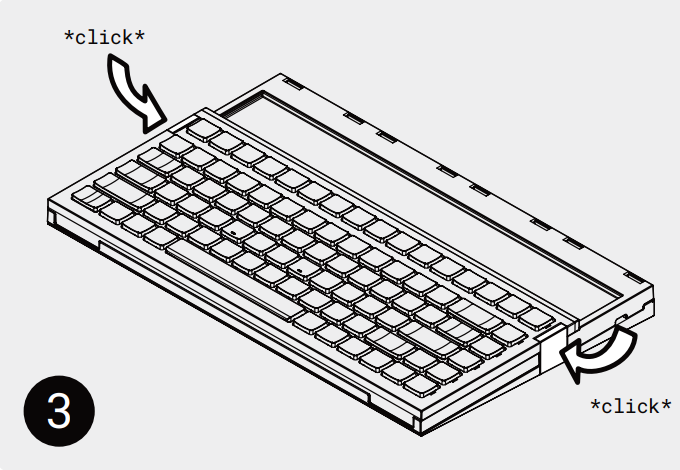
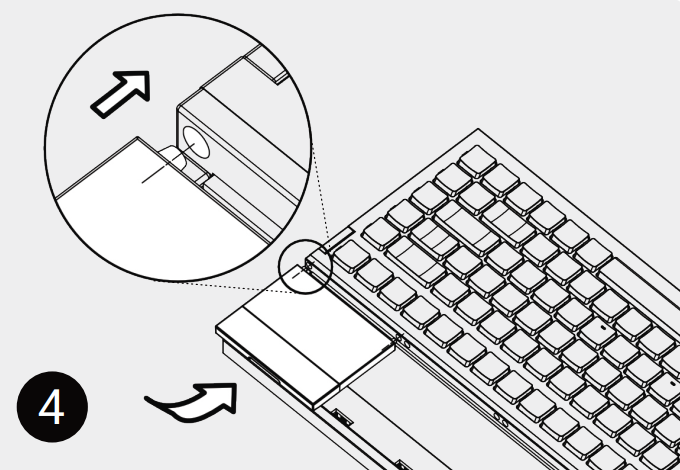

Connecting your keyboard
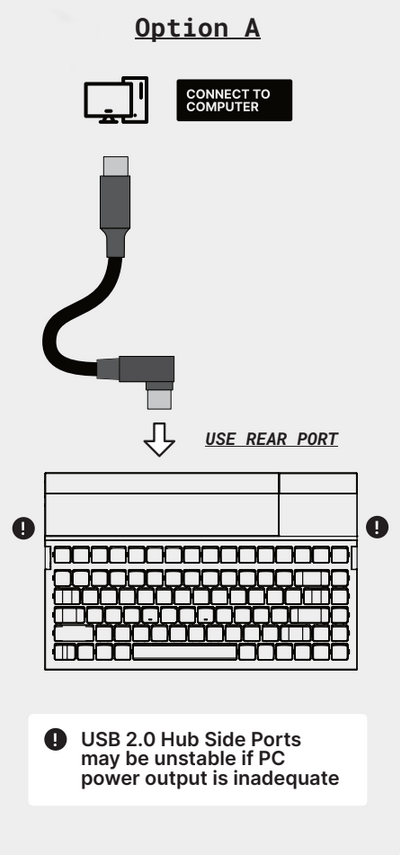
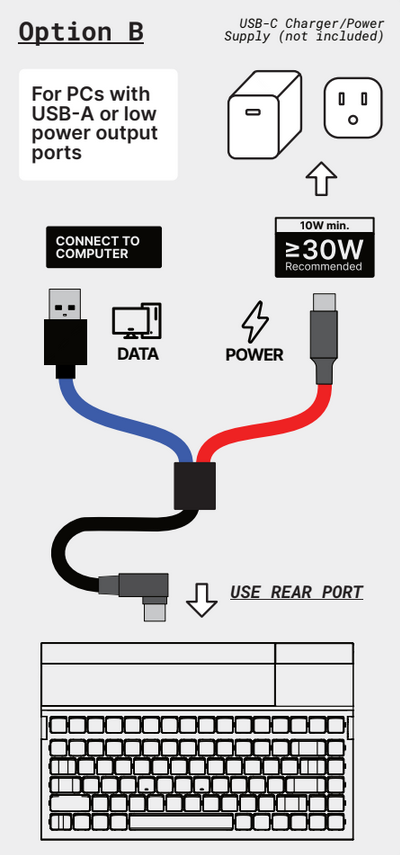
Input and output ports on your keyboard
Your keyboard has three ports. The rear USB-C input port is for connection to your computer/device.
The x2 USB-C hub ports on the left and right sides are for additional devices such as USB-dongles, USB-receivers etc.
These hub ports can output a maximum of 5v 1.5A per port. It is recommended if using the hub ports to have at least 30w of power supplied to the keyboard.
Install Polymath
Polymath installation
Download and install Polymath software here.
The first time you run Polymath you may be prompted to perform a firmware update on your keyboard. This can take a few minutes to complete during which time your keyboard may reset itself.
Using your keyboard without Polymath
Your keyboard will function, type normally when plugged into a computer that does not have Polymath running or installed.
However, some features such as automatic profile switching, typing language detection and clocks/time tiles, hardware monitoring tiles, weather modules and active media tiles will not function. This is because Polymath is required to maintain communication with the keyboard for these to work.
You can still manually change profiles and actuation modes via. the FN layer.
Polymath
Overview of tabs
Polymath is organised into a series of tabs.
- Profile is used to organise and assign shortcuts, themes, actuation modes, layers and applications to different profiles
- Themes is for customisation of appearance and visuals
- Actuation is for changing or editing actuation points and rapid trigger
- Keymap is used for organising layers, remapping and assigning keys and generating layer switching keys
- Shortcuts is used for creating, viewing and editing shortcut sets
- Modules is used for adding, removing and customising tiles
- Device is used for adjusting screen off, parallax and calibration settings
Automatic typing language detection
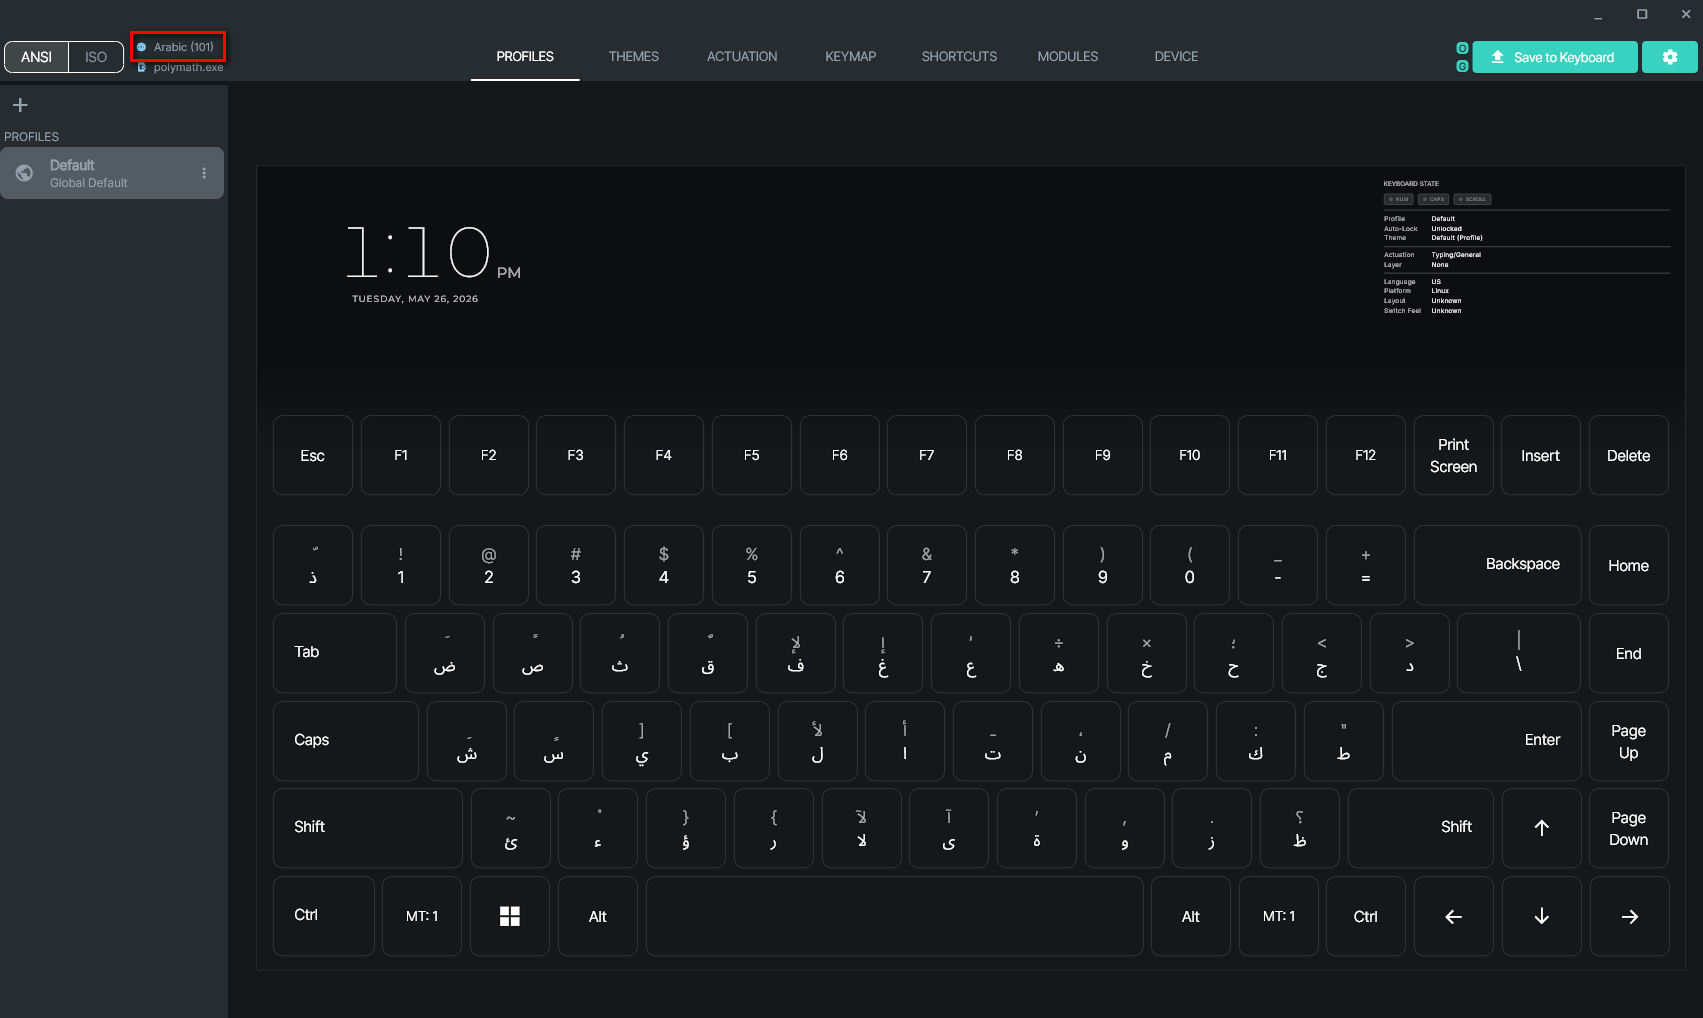
Polymath detects your system’s typing language and your keyboard will automatically adjust its layout to match this.
The current detected typing language is displayed in the top left corner in Polymath and a visual display of the keyboard layout in the language is shown in the main window.
Displaying application shortcuts on your keyboard
Your keyboard can show keyboard shortcuts for a number of included applications where that application is in focus or if it is the active window.
To do this requires associating a shortcut set and application with a profile.
This can be done easily via. the Auto Setup Wizard which is found in the top left hand corner in the Profiles tab:
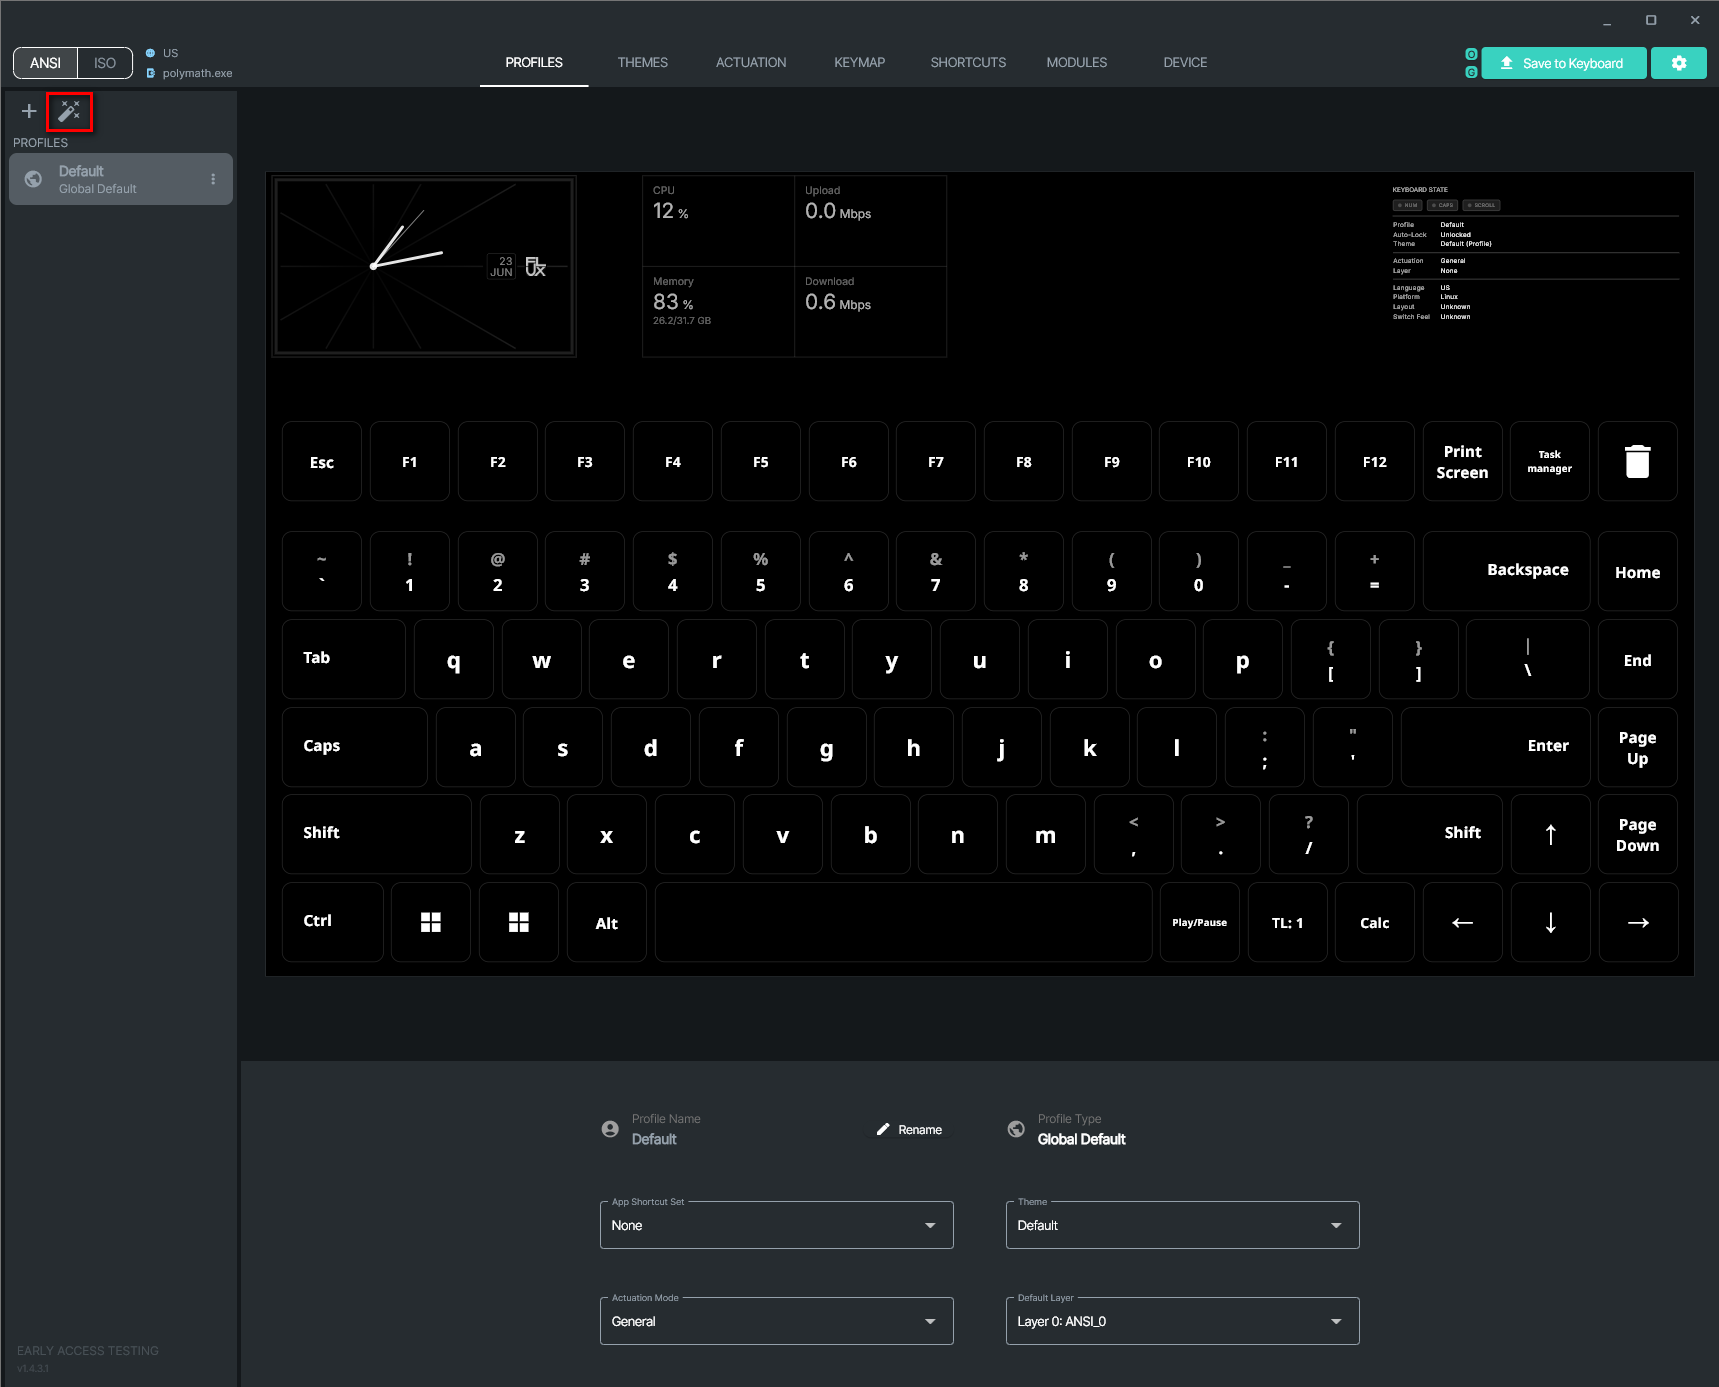
The Auto Setup Wizard can also be found in the same location in the Shortcuts tab.
The Auto Setup Wizard detects applications on your computer and can create profiles and automatically assign shortcut sets for those profiles:
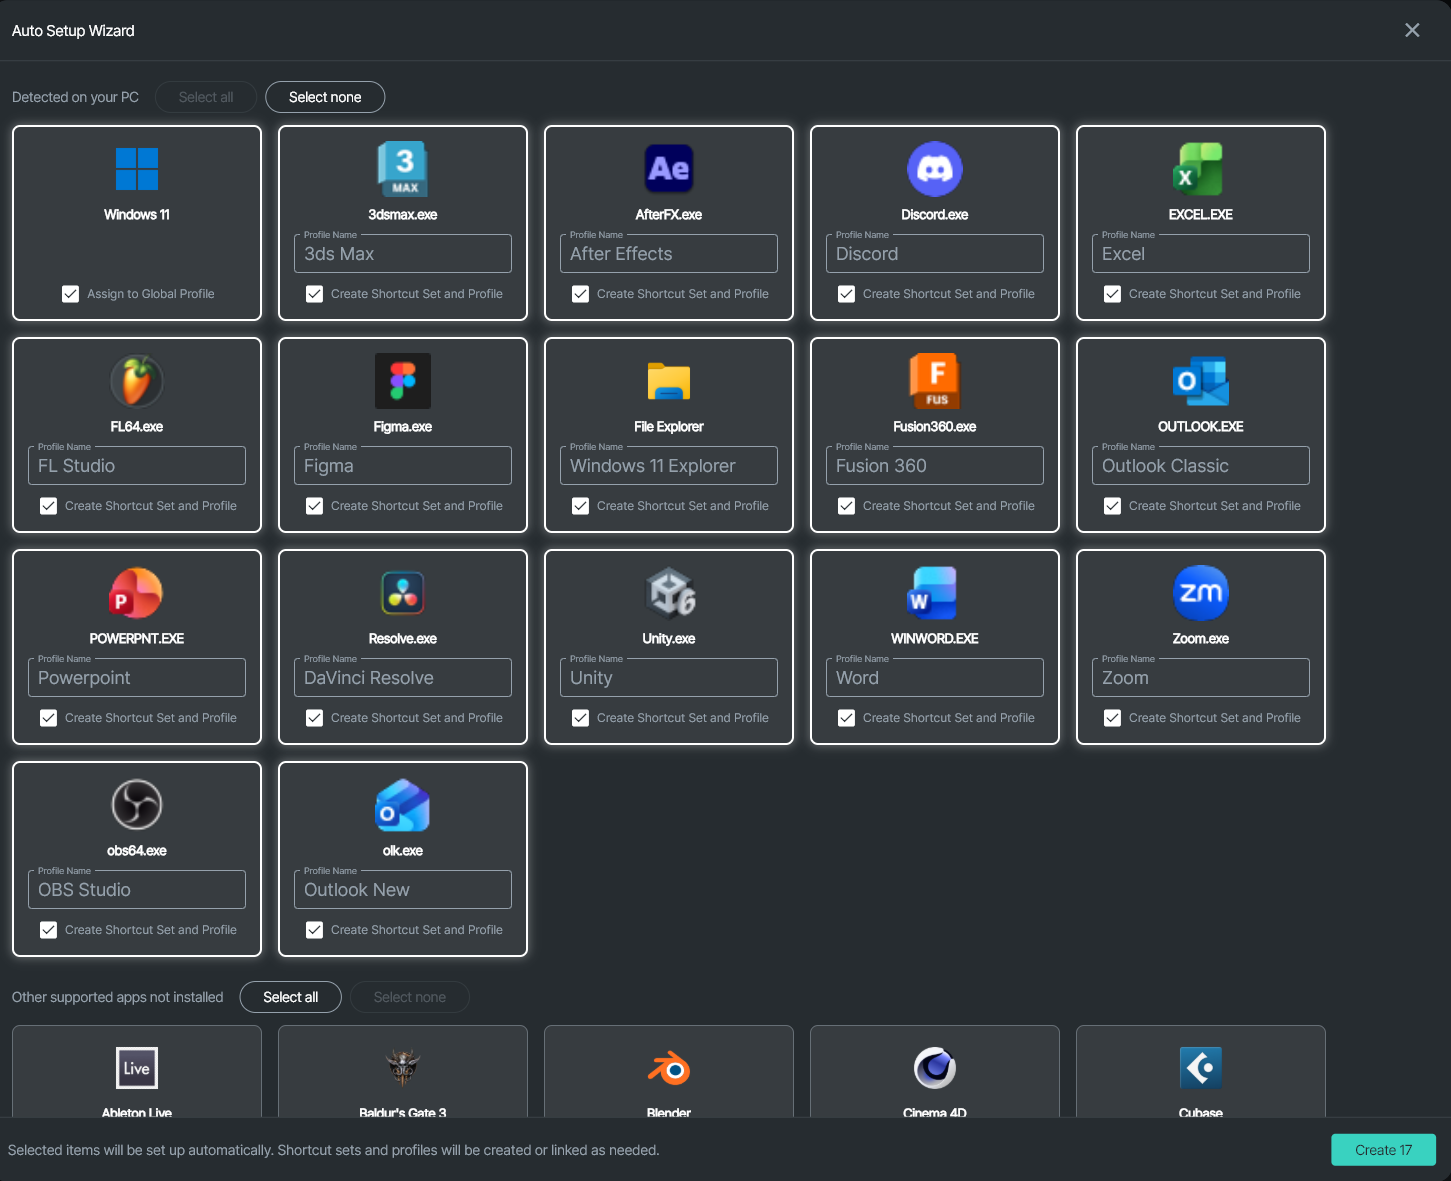
You can also see any shortcut sets that you have created but are currently unassigned to a profile in the wizard and shortcuts where the relevant application has not been installed on your computer:
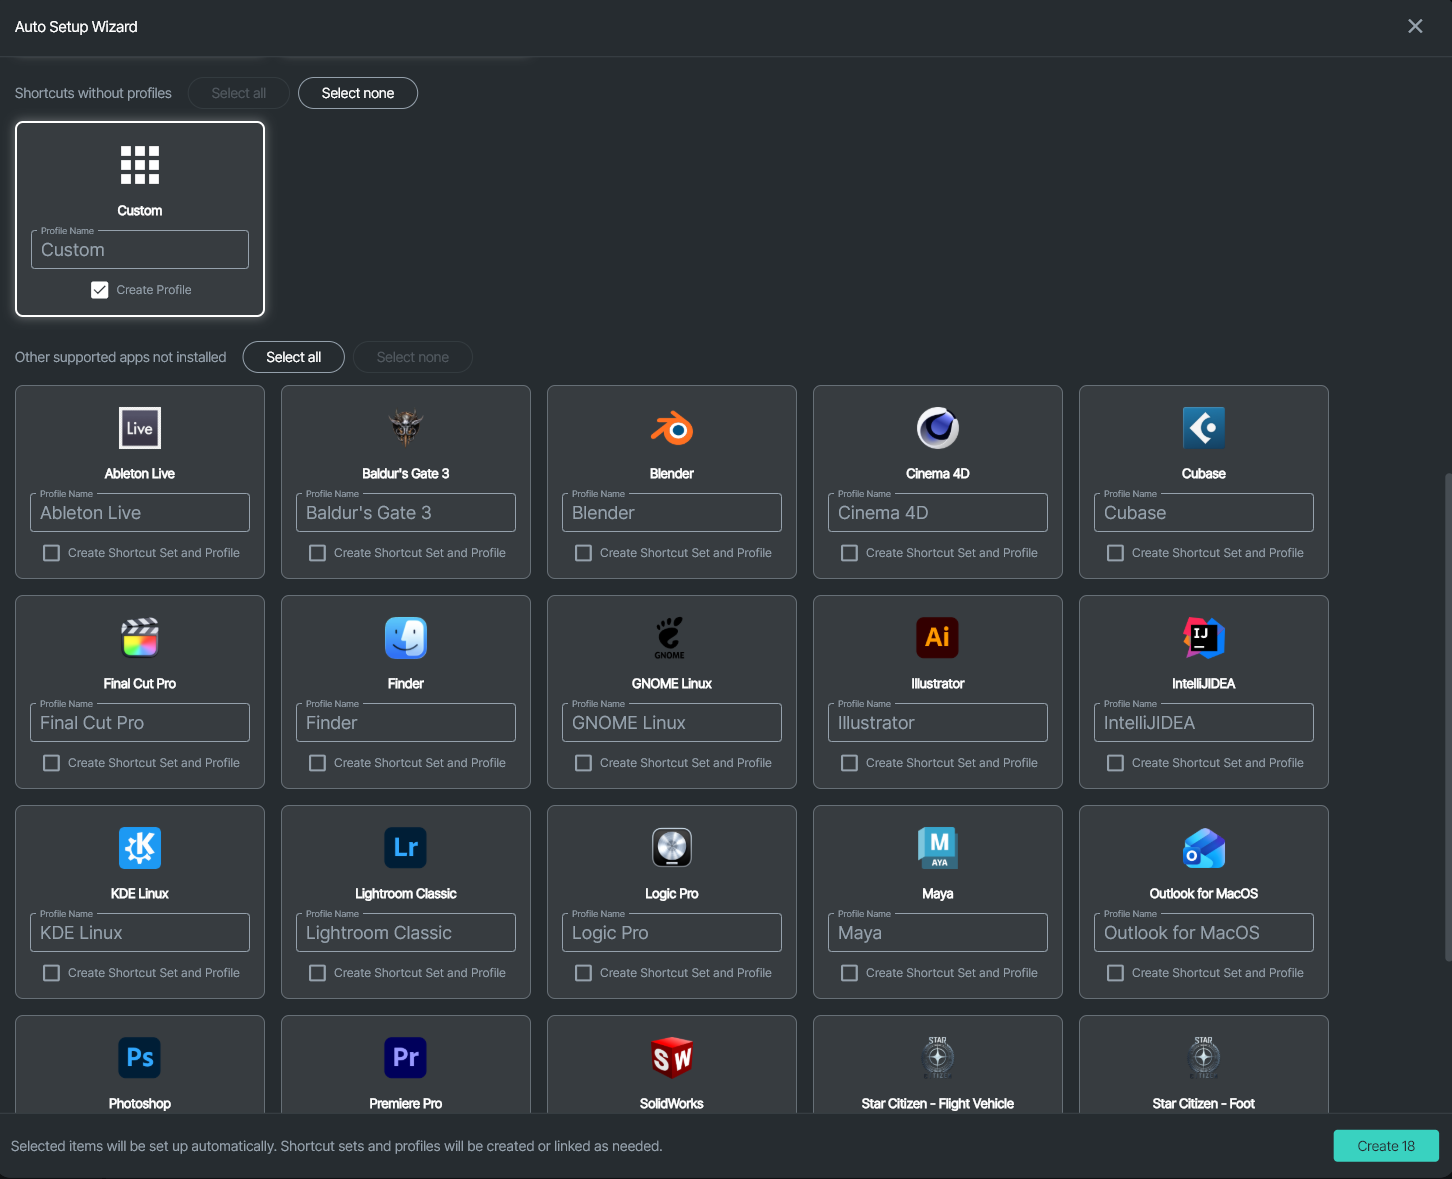
It is also possible to manually assign a shortcut set.
To do this:
- Under Shortcuts click the + icon in the top left
- Select the desired shortcut set and press Create, if making a custom shortcut set, you would then populate it
- Under Profiles click the + icon in the top left
- Name the profile
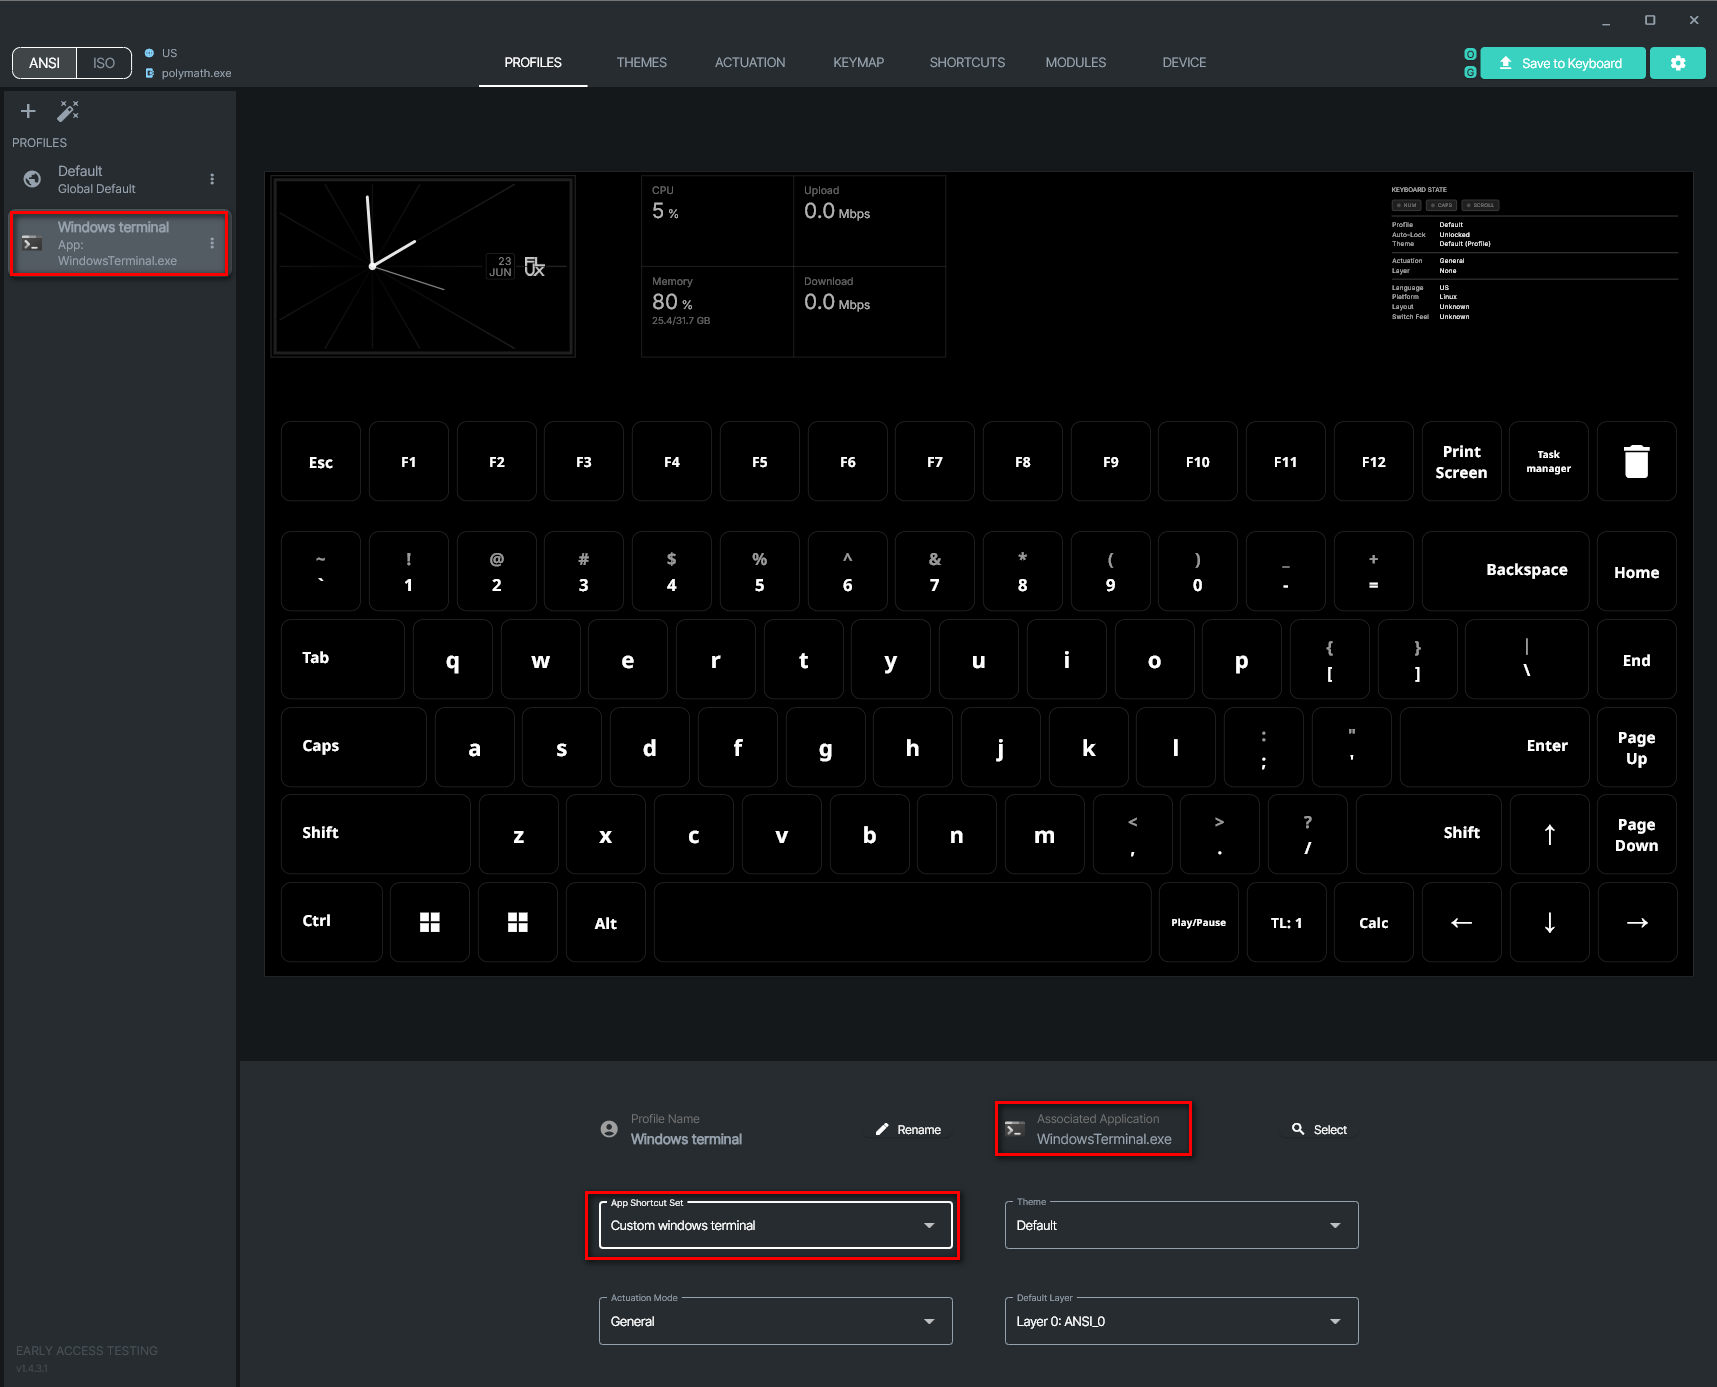
- Under the App Shortcut Set dropdown, select the shortcut set you created
- Next to Associated Application press Select then set an association with the desired application by either selecting it from the Running Applications list (you will need to open an instance of it) or by browsing for it
- Press Save to Keyboard
For example if this was done with a custom shortcut set associated with the Windows Terminal application, your profile would look similar to the below:
Polymath shows the current detected application in the top left-hand corner:
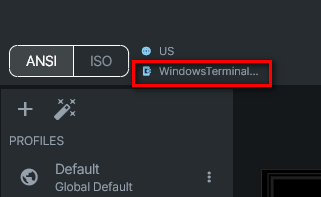
Opening or switching to an application will trigger any associated profile and its shortcuts to be displayed. The visibility of shortcuts on the keyboard is affected by the state of any modifier keys.
For example, the Undo shortcut in Microsoft Word would only become visible if you hold down the Ctrl key as the shortcut for undo has the Ctrl modifier as part of the shortcut (Ctrl + Z) but the shortcut for Repeat Action (F4) has no modifier key and would remain visible while no modifier keys are pressed.
Creating and editing shortcuts
To create your own shortcut set, under Shortcuts click the + icon in the top left and name and Create a new Blank shortcut set.
You can then add your own shortcuts using + Add custom shortcut.
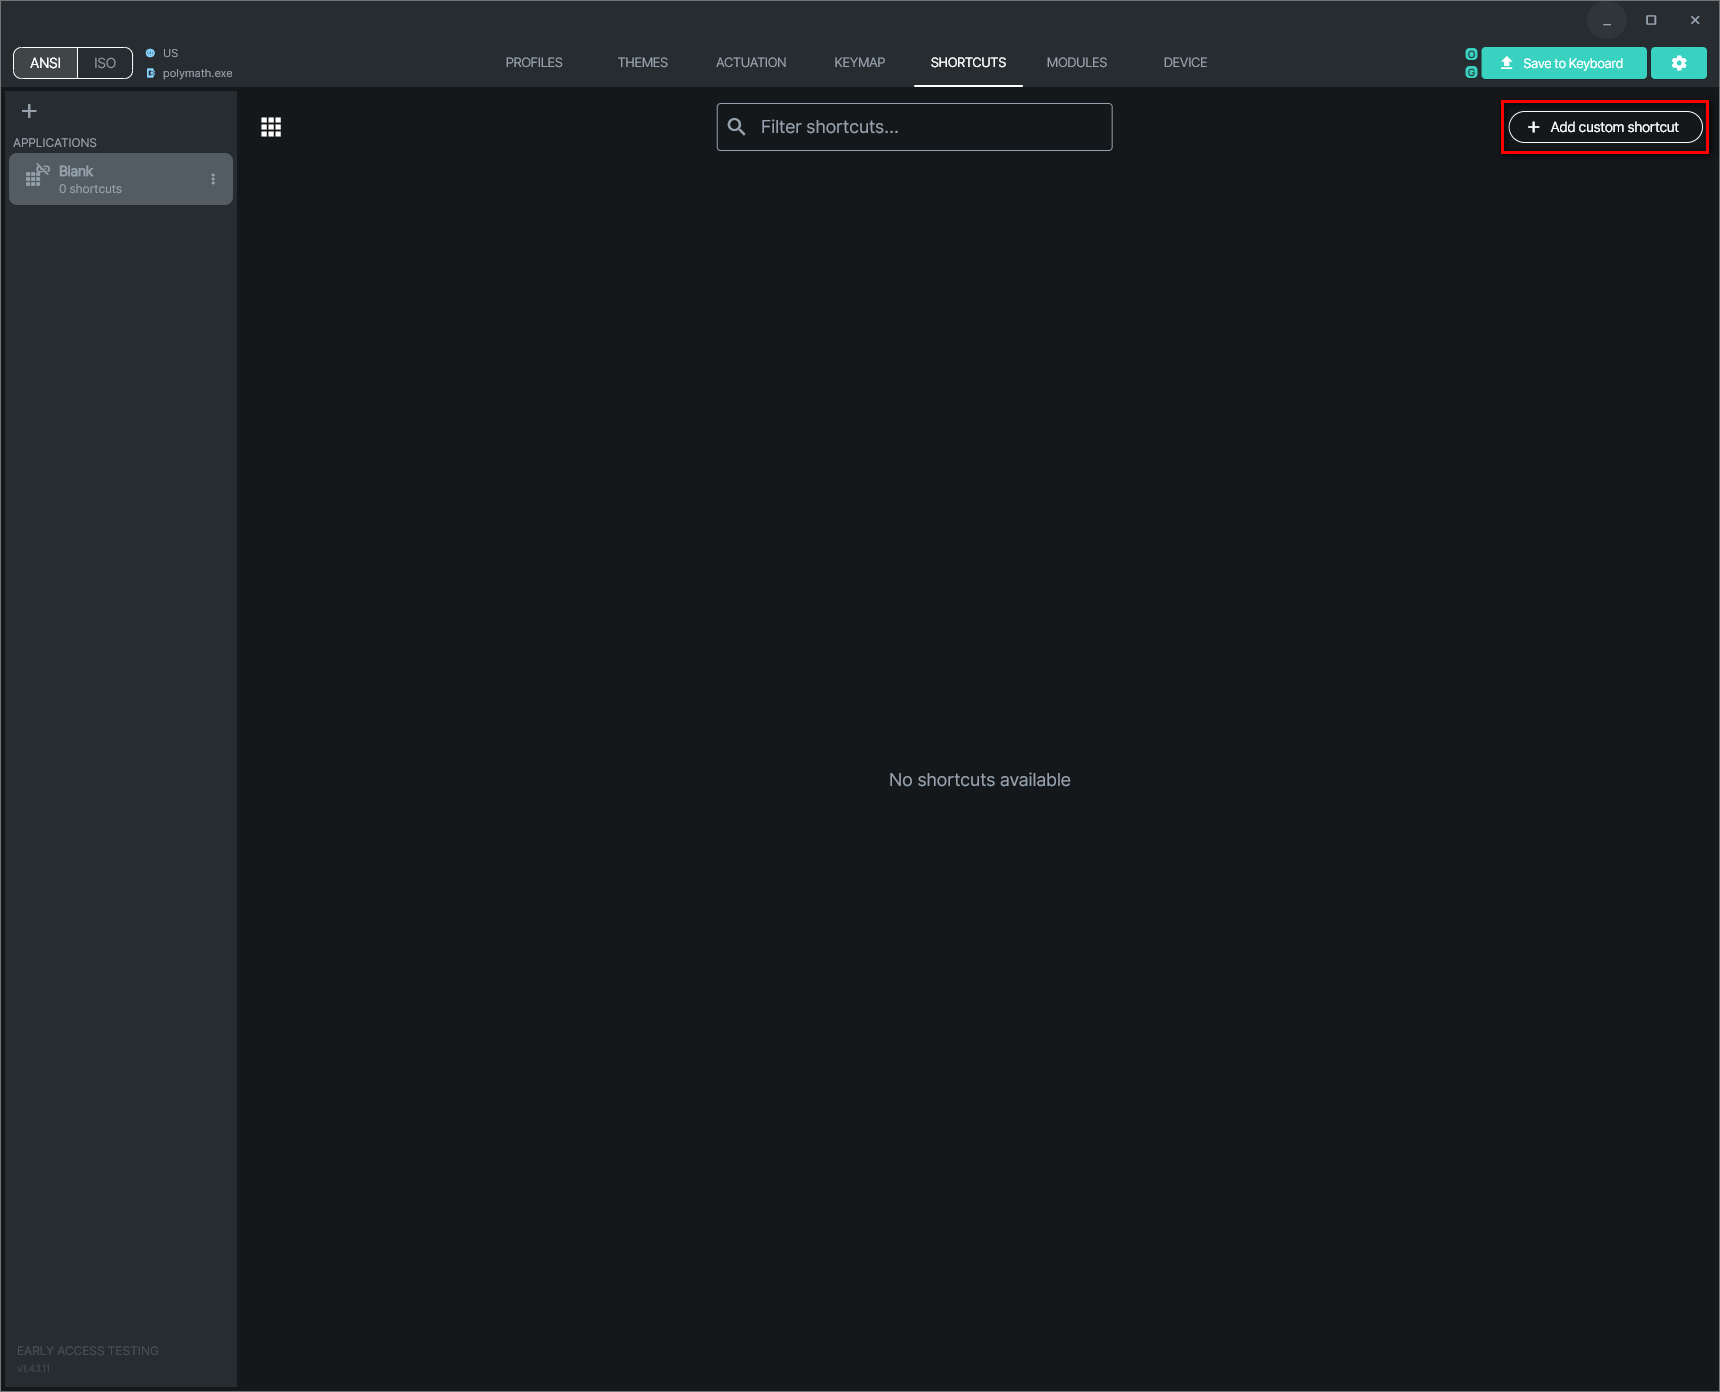
You can also adjust and edit an existing shortcut set by going to that set and using Edit under Actions. You can also add a new shortcut by using + Add custom shortcut.
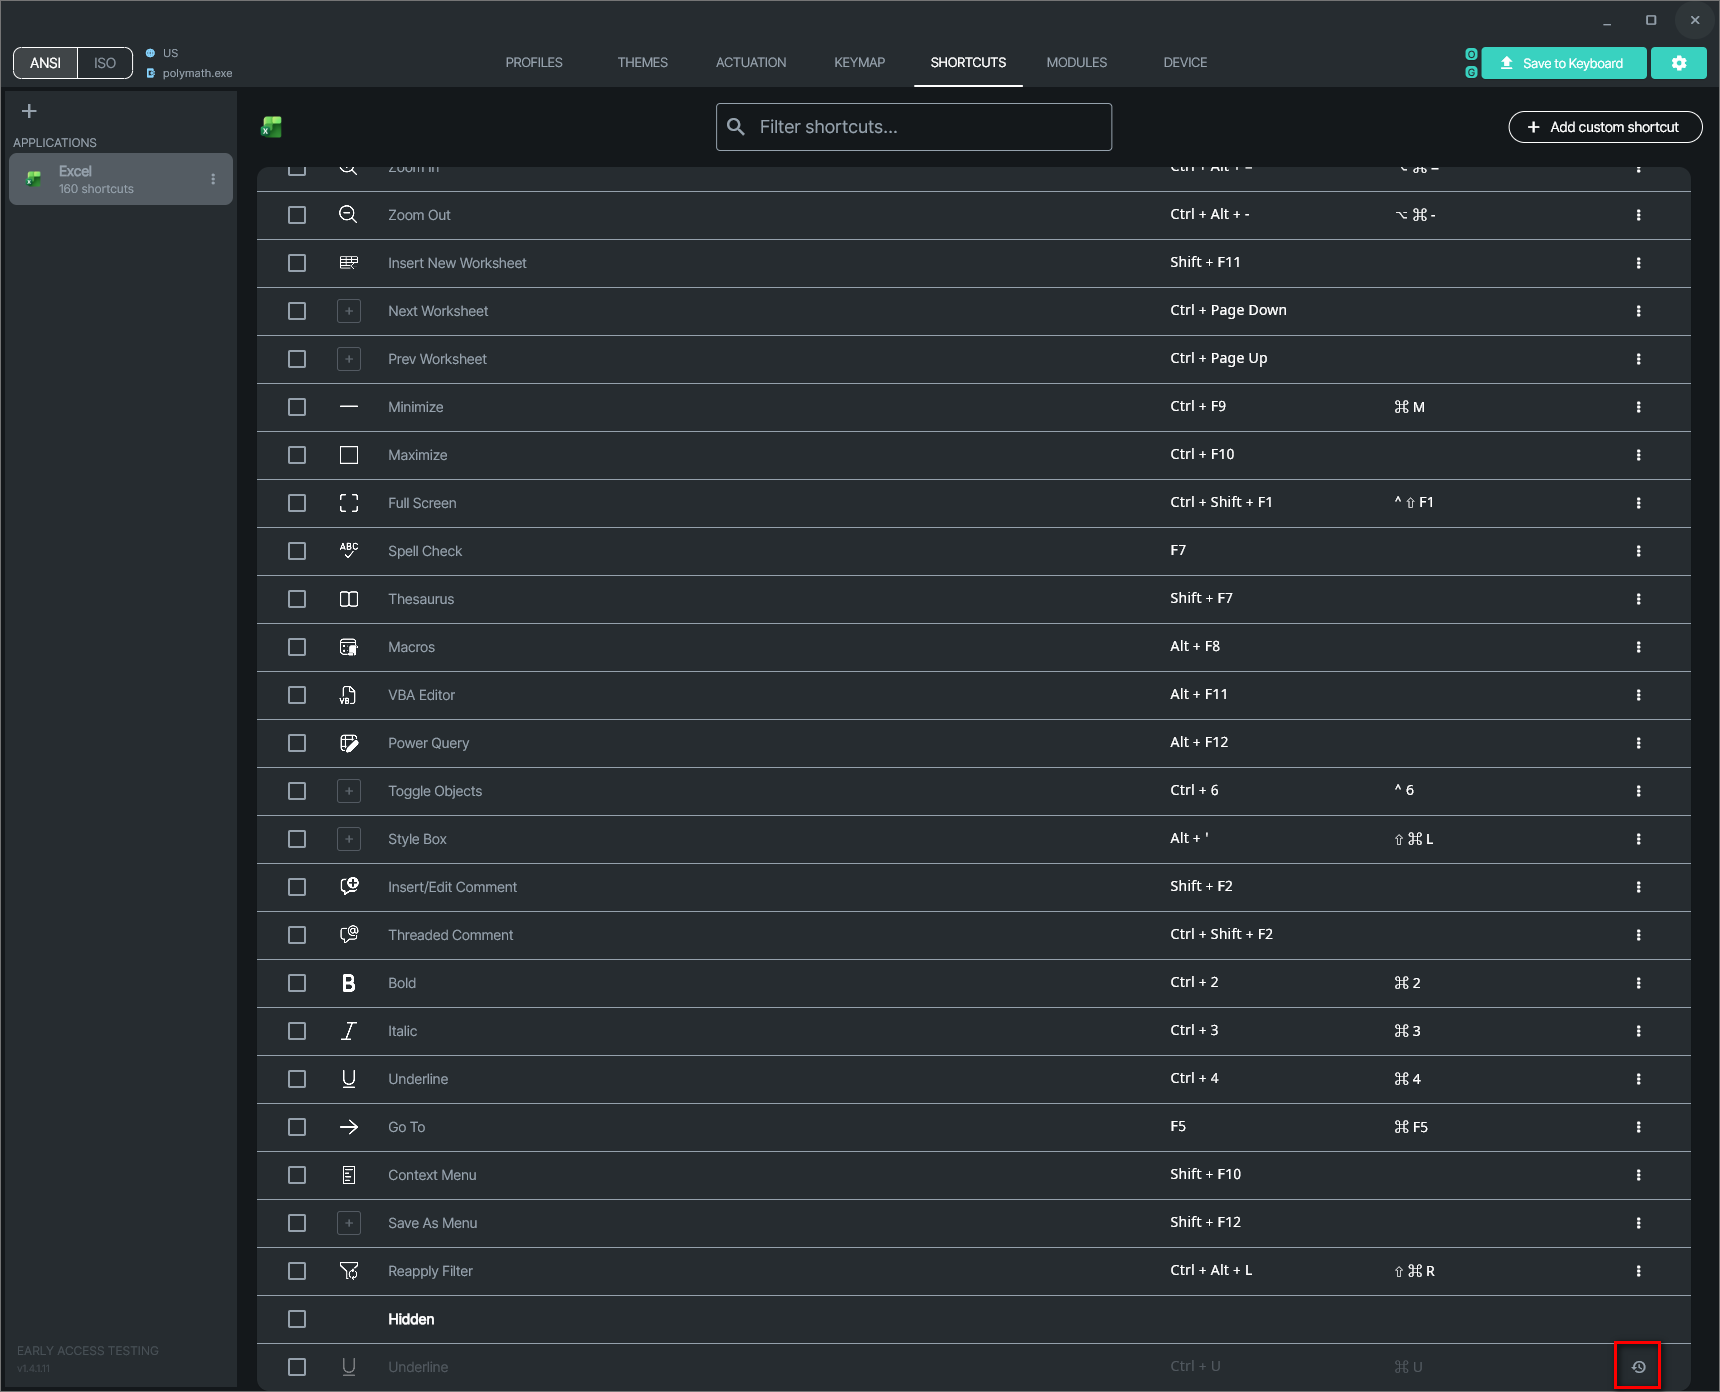
If you have used Hide on any shortcuts, this will disable them. You can find them by scrolling to the bottom of the shortcuts where they can be restored by pressing the Restore icon.
Themes and appearance
Visual aspects of your keyboard can be fully controlled and customised in the Themes tab.
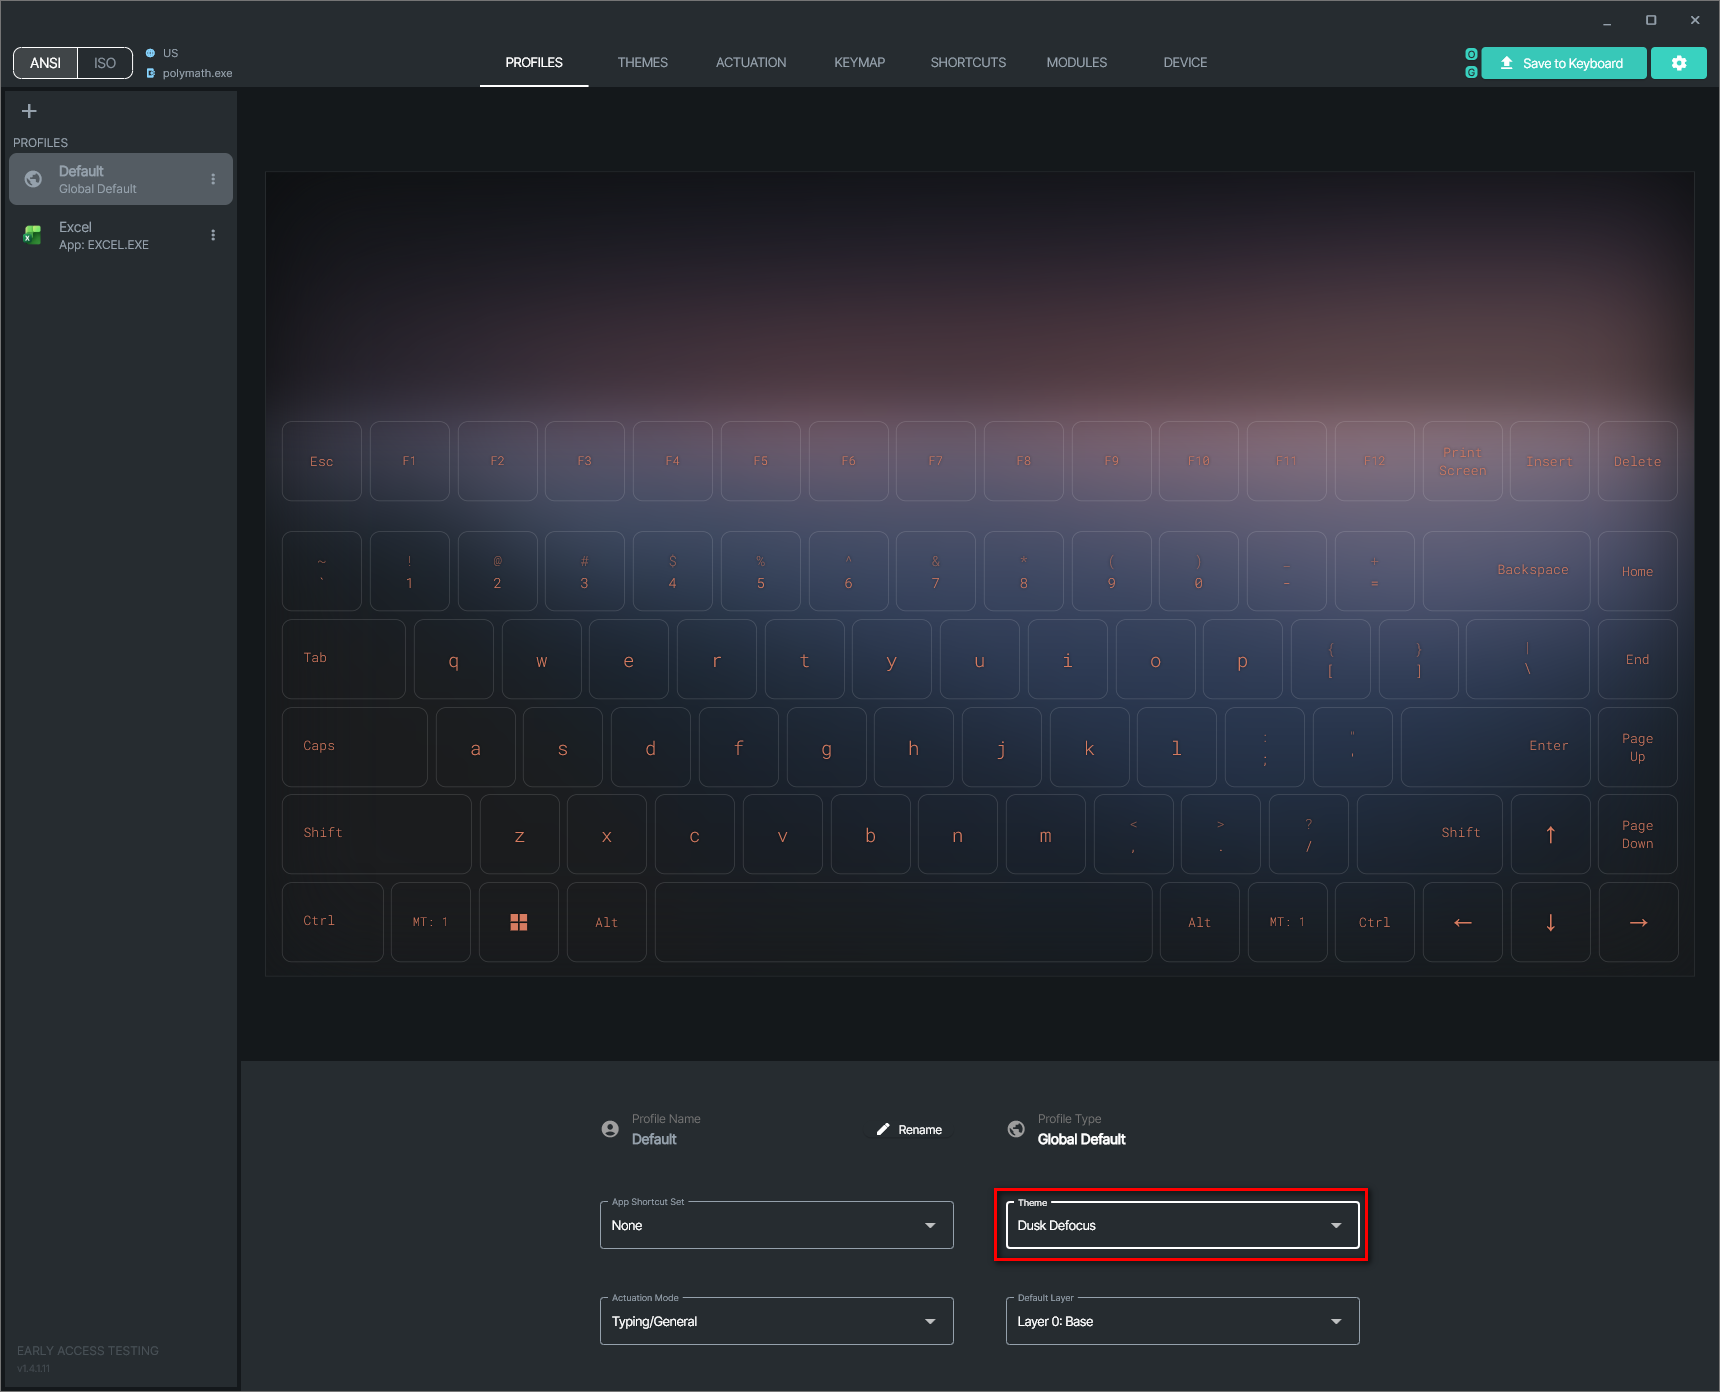
After creating a theme, you can associate that theme to a profile in the Profiles tab under the Theme dropdown menu.
Backgrounds
You can upload your own backgrounds or select from preloaded backgrounds to customise your keyboard in Themes under the Backgrounds sub tab.
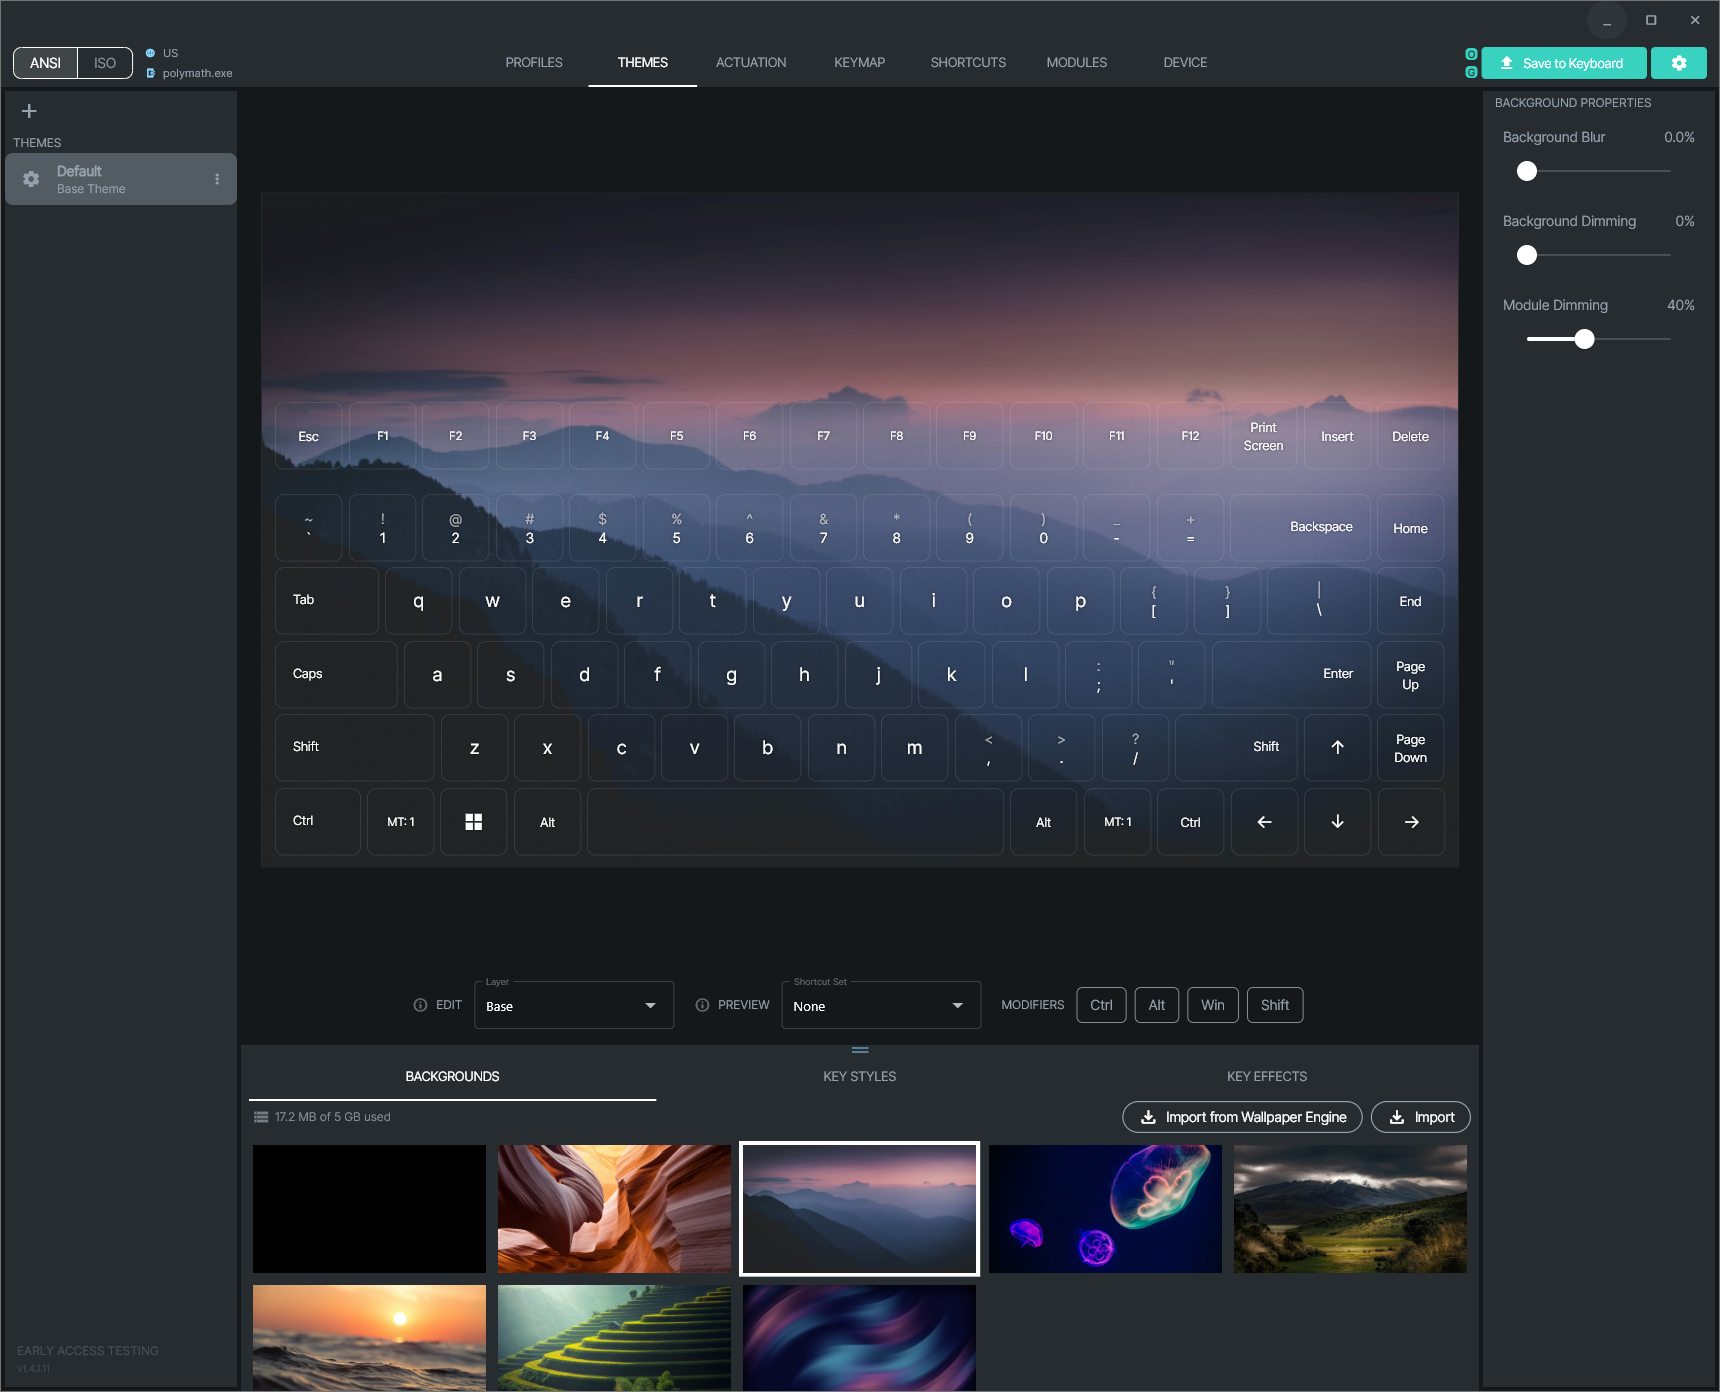
Accepted file extensions when importing are: .png .jpg .jpeg .mp4 .mov
Recommended video codecs: H.264, H.265 or VP9
Max supported resolution & frames: 1920 x 1080 @ 60 frames/s
Please note that image and video files can have an extension that appears fine and useable, but may have underlying codecs, encoding or characteristics that may make them incompatible or unable to be used.
Wallpaper Engine
You can import media from Wallpaper Engine.
If Polymath is unable to automatically detect your Steam folder, you will need to set the location of your Steam Folder in Settings.
Key Styles
In key styles your can customise the legends and icons that appear on the keyboard.
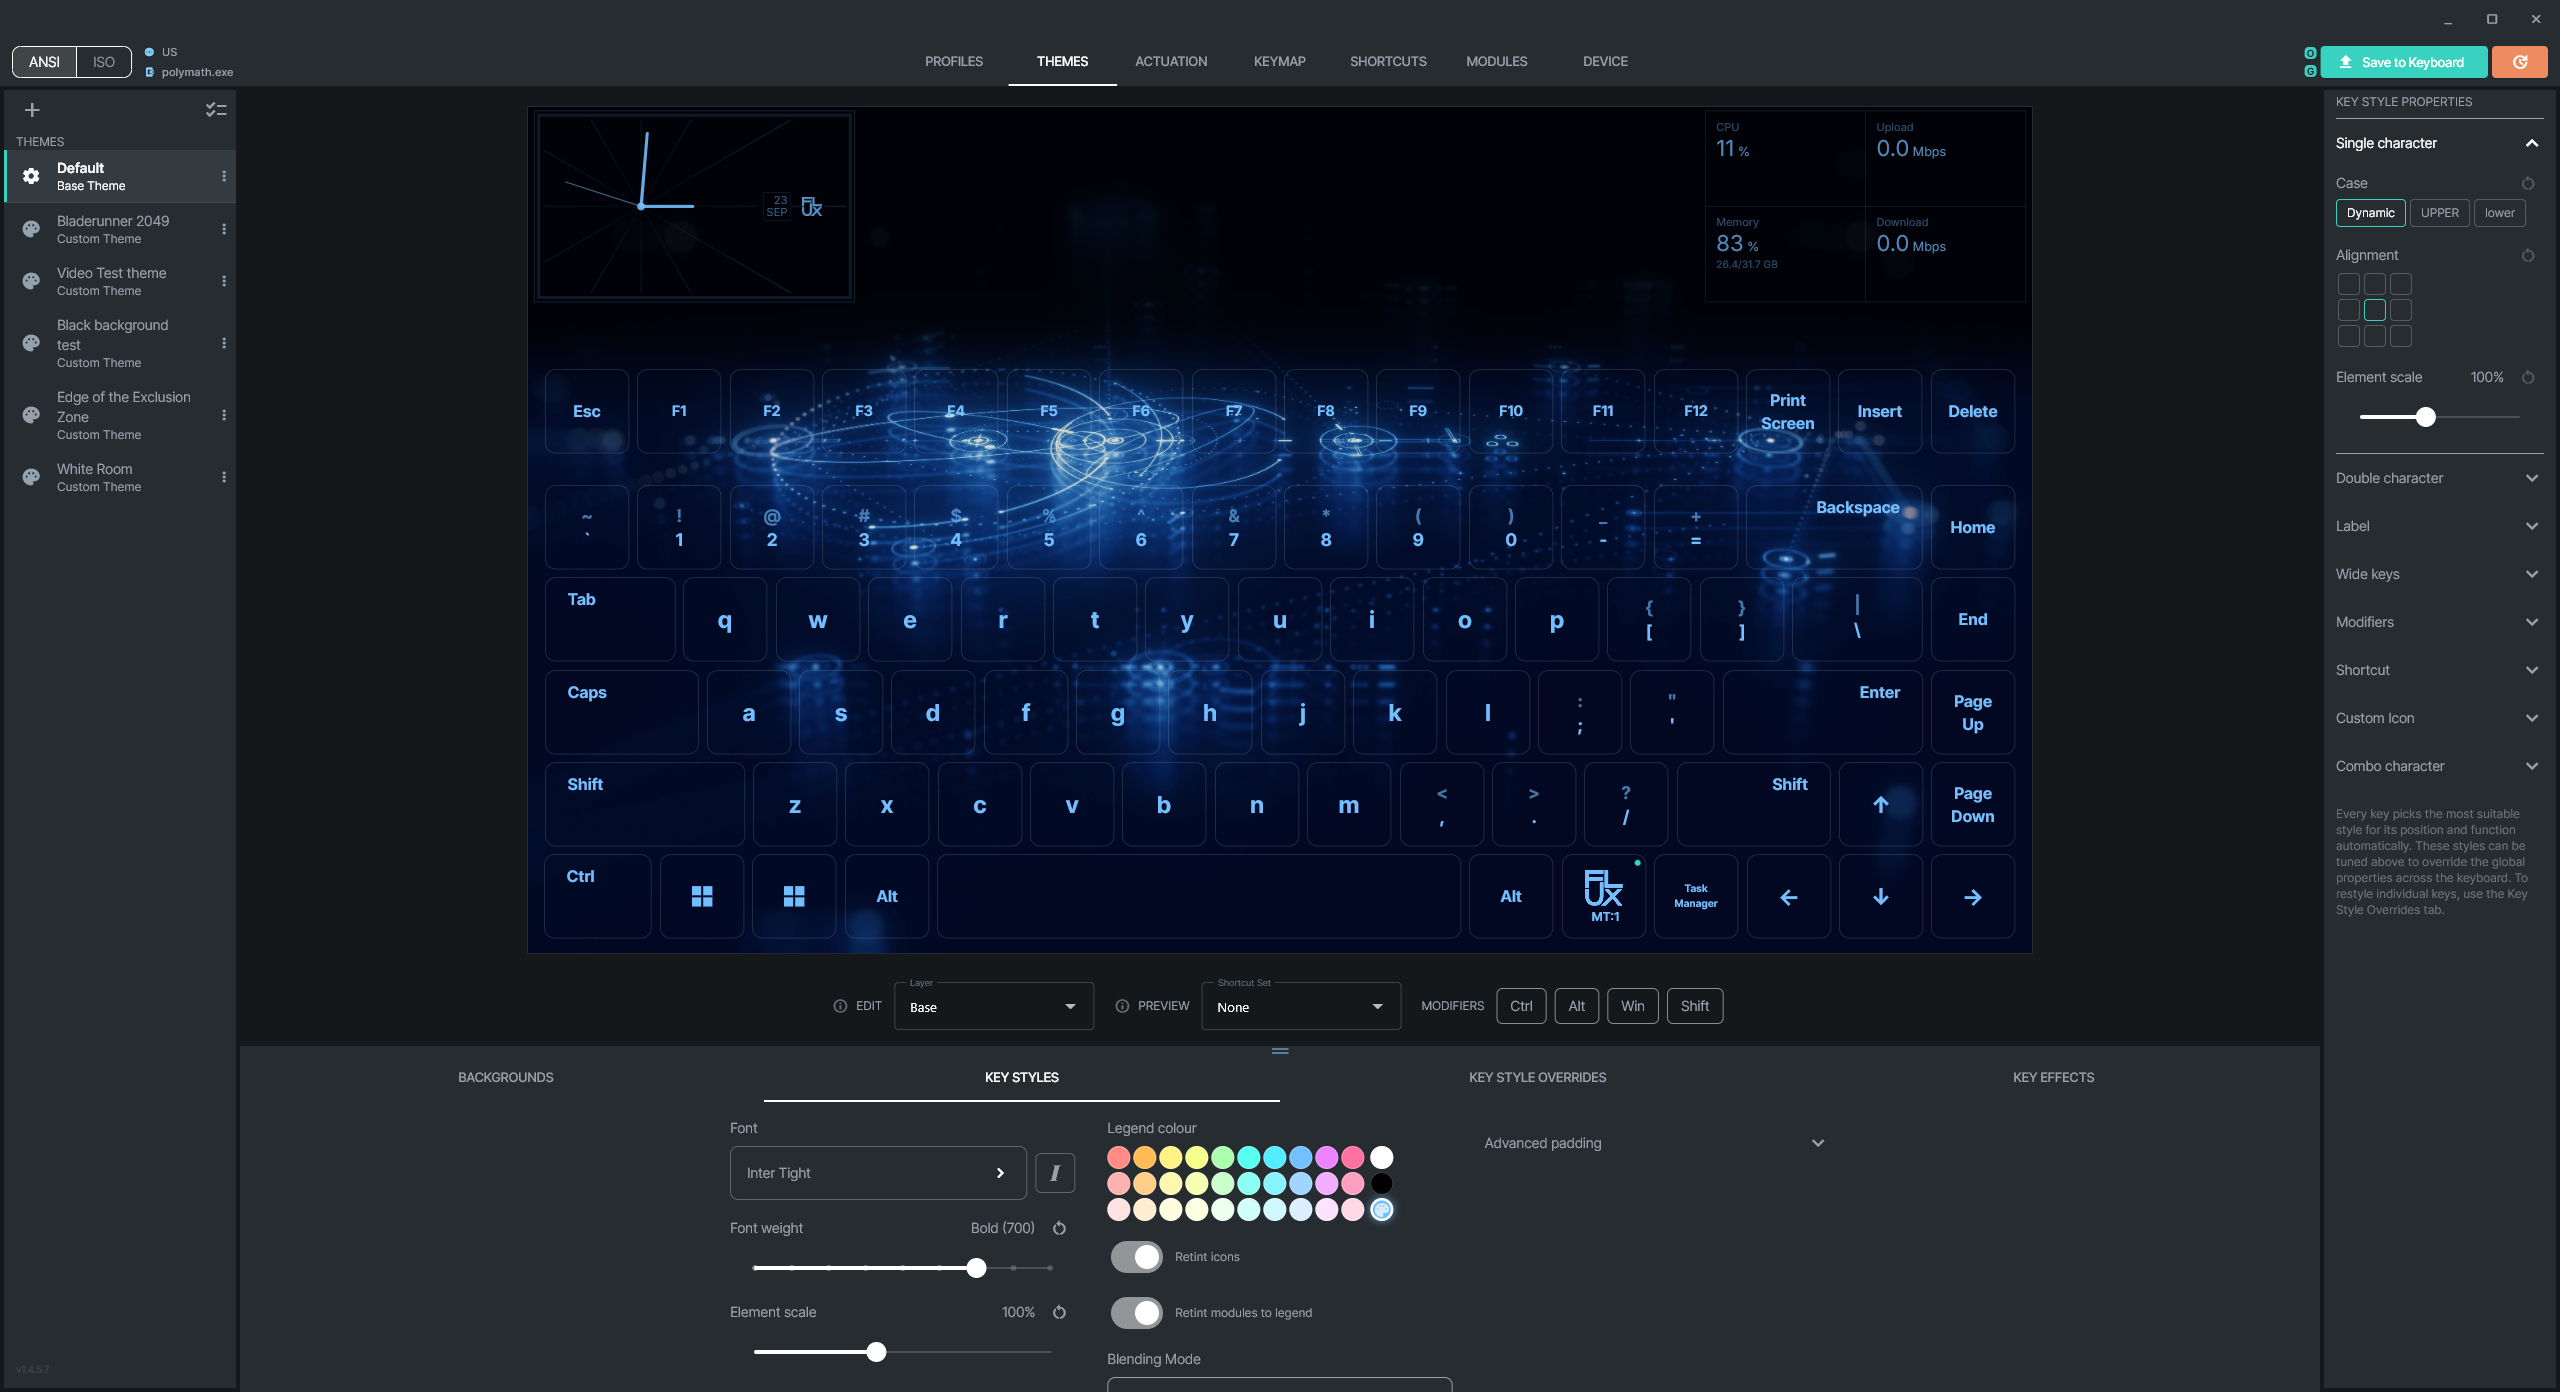
There are many options for customisation:
- You can select different fonts and also import custom fonts under Font > Import fonts…
- You can also select and change legend colour either through the pre-selected colour swatch or through the custom selection which also allows for modification of alpha channel/transparency
- Retint icon will tint icons to match the Legend colour where possible
- Retint modules to legend will match the module elements to the Legend colour
- Blending Mode allows selection of display modes for legends and icons to help with legibility on certain backgrounds
- Advanced padding allows fine adjustment of padding area for displaying elements across keys
- In the side bar, key style properties breaks down all of the keys into different categories that contain a range of options for customisation and positioning
- Restyling individual keys is done in the Key Styles Overrides tab
Key Style Overrides
The Key Style Overrides tab allows individual keys to be visually styled exactly how you wish and to ignore the Key Styles set under the Key Styles tab.
Note that this will change the visual appearance of the key but not the actual function of the key. Changing the function of the key is done through Keymaps.
Under Key Style Overrides you can:
- Change the display style
- Add a label
- Add an icon
- Select the case
- Modify the alignment/position on the key
- Scale the visual element
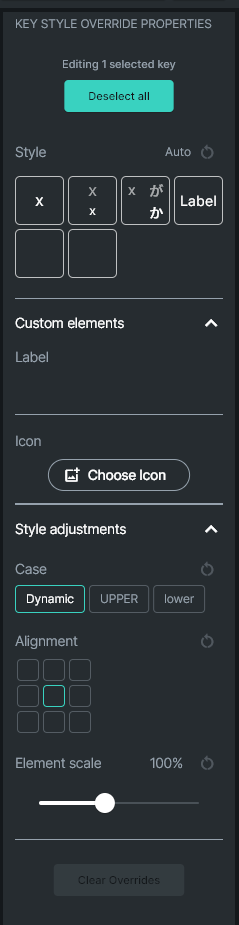
A list of all the overrides that are active on a keyboard layer is displayed. Overrides are stored per layer. You can change the layer that you are viewing and editing by choosing the layer from the drop down menu.

Also, note that key style overrides are independent of the Keymap so moving or changing a key in the Keymap will still have the key style override remain in the same place on the keyboard. This will not change until the key style override is modified or the key style override is cleared (the default appearance for the key mapped key will then be used).
Actuation Settings
Actuation is the point at which a key is pressed far enough for the switch to register the input and send the signal to your computer. Rapid Trigger mode lets a key re-activate the moment you start releasing it, allowing much faster repeated key presses without needing to return the key to its reset point.
Your keyboard can have multiple actuation settings defined and also individual per key actuation point between 0.4mm and 2.8mm as well as rapid-trigger. These are all set under the Actuation tab.
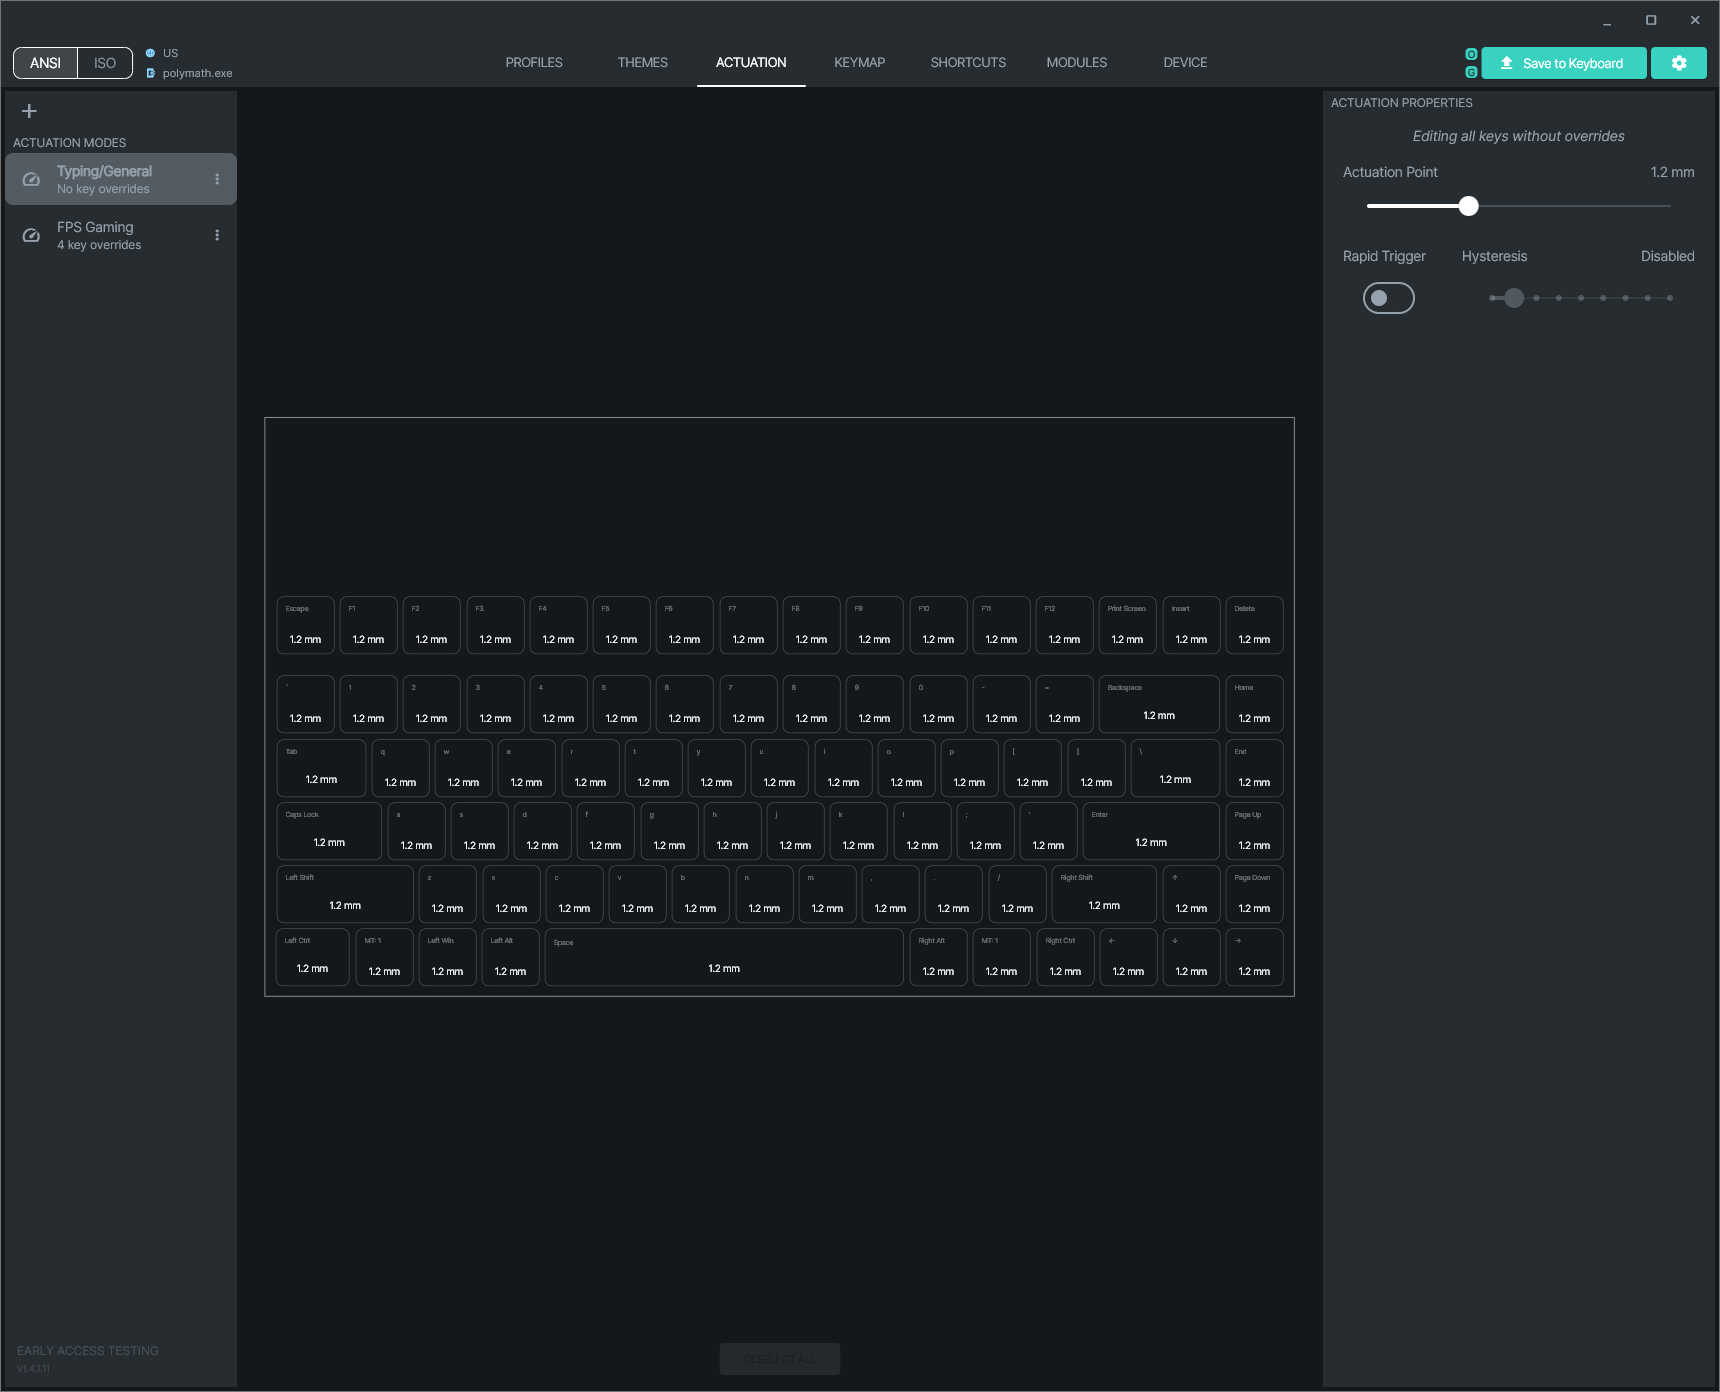
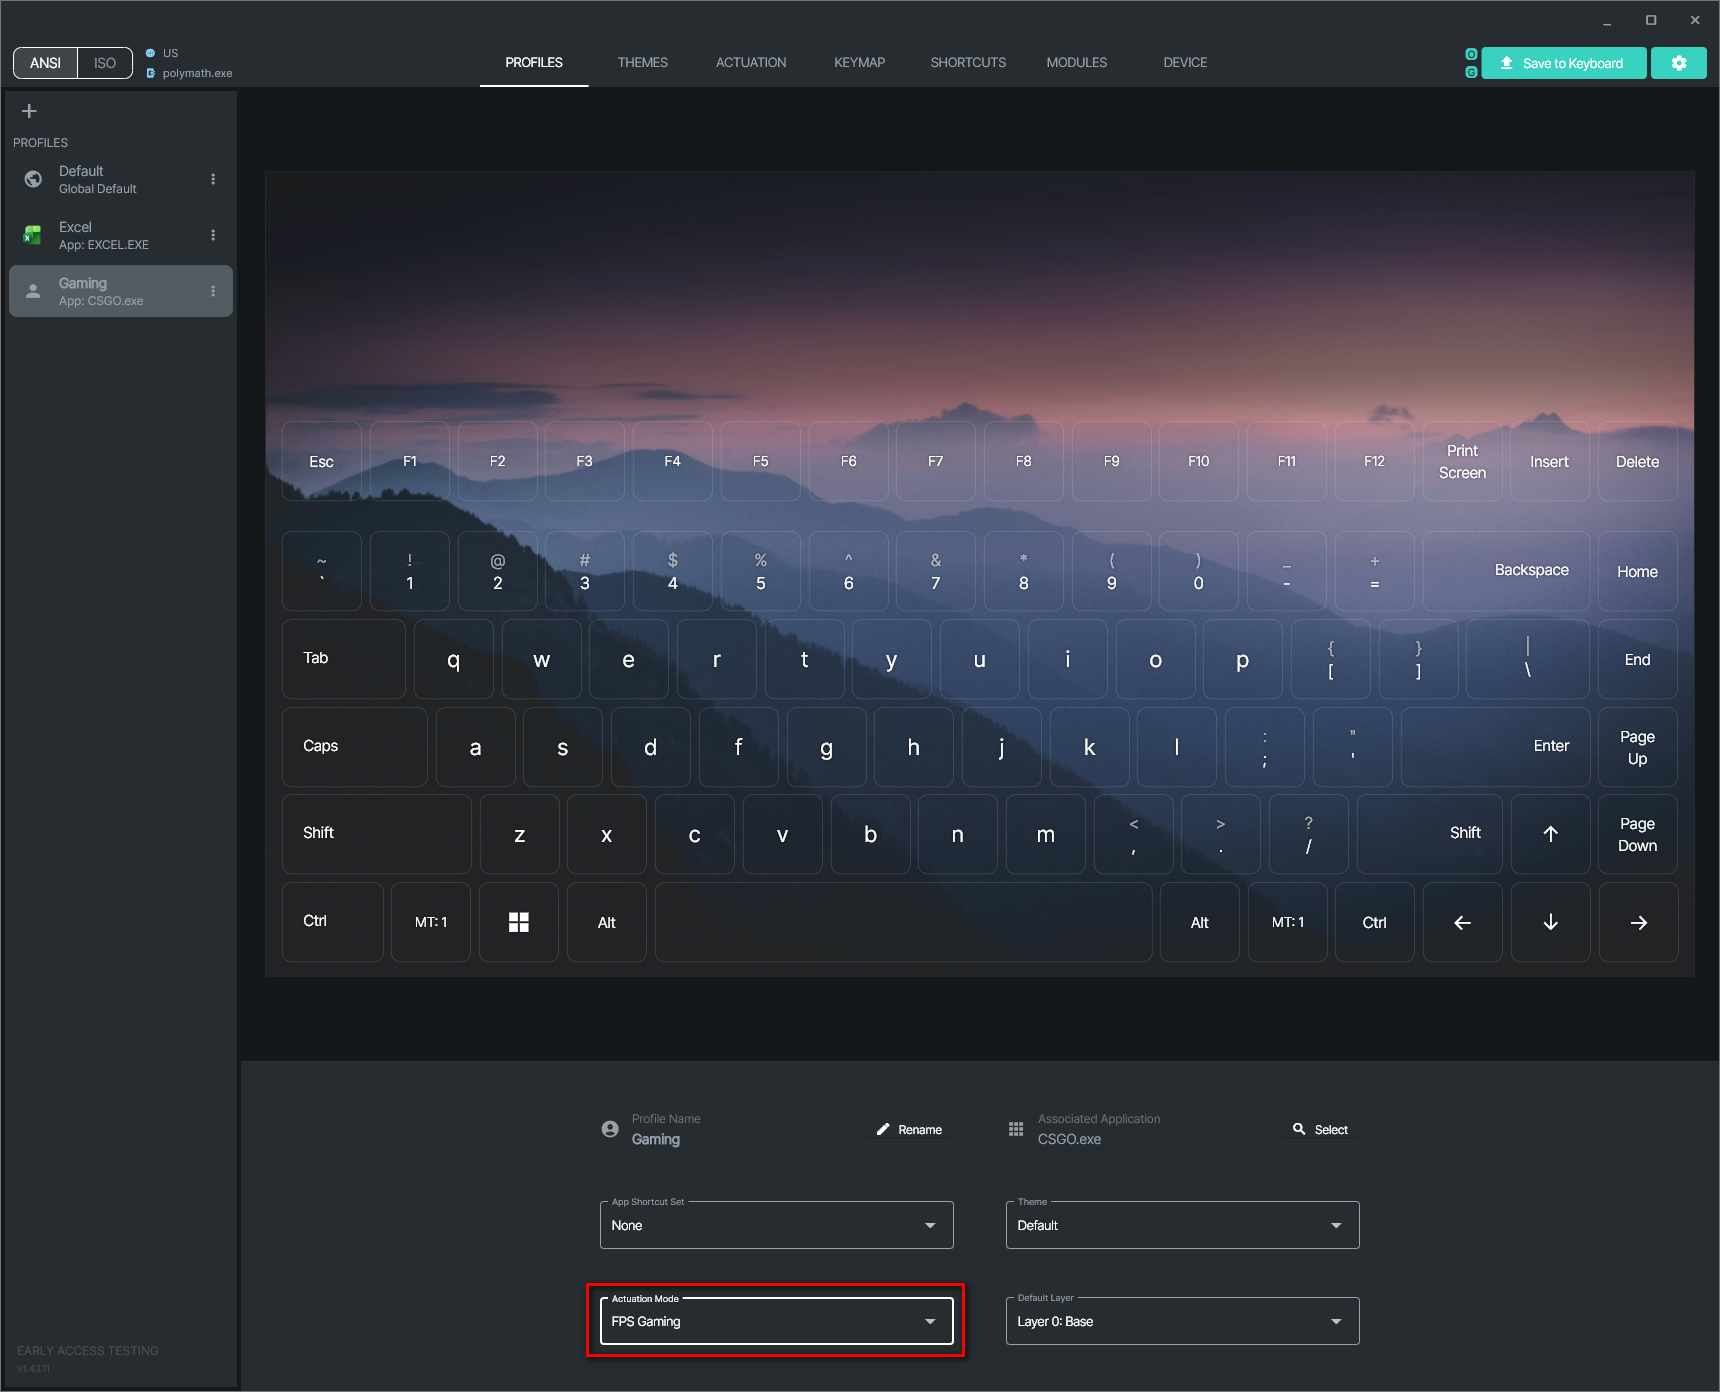
You can associate an actuation setting with an application via. the Profiles tab. For example you may wish to have an FPS Gaming actuation setting that is active only when you are in a specific game:
Modules and tiles
Your keyboard features module spaces where you can place tiles to display information for convenient visibility and monitoring.
To add a tile to your keyboard, go to the Modules tab and drag and drop the desired tile on to one of the tile spaces.
Note that clocks/time tiles, hardware monitoring tiles, weather modules and active media tiles will not function and will display as greyed out if Polymath is not running. This is because Polymath is required in order to maintain communication with the keyboard for these tiles to function.
Pomodoro timer tile
The Pomodoro Technique is a time management method to break down work into intervals separated by short breaks. Each interval is known as a pomodoro.
Your keyboard can run a pomodoro timer which can be added in the Modules tab.
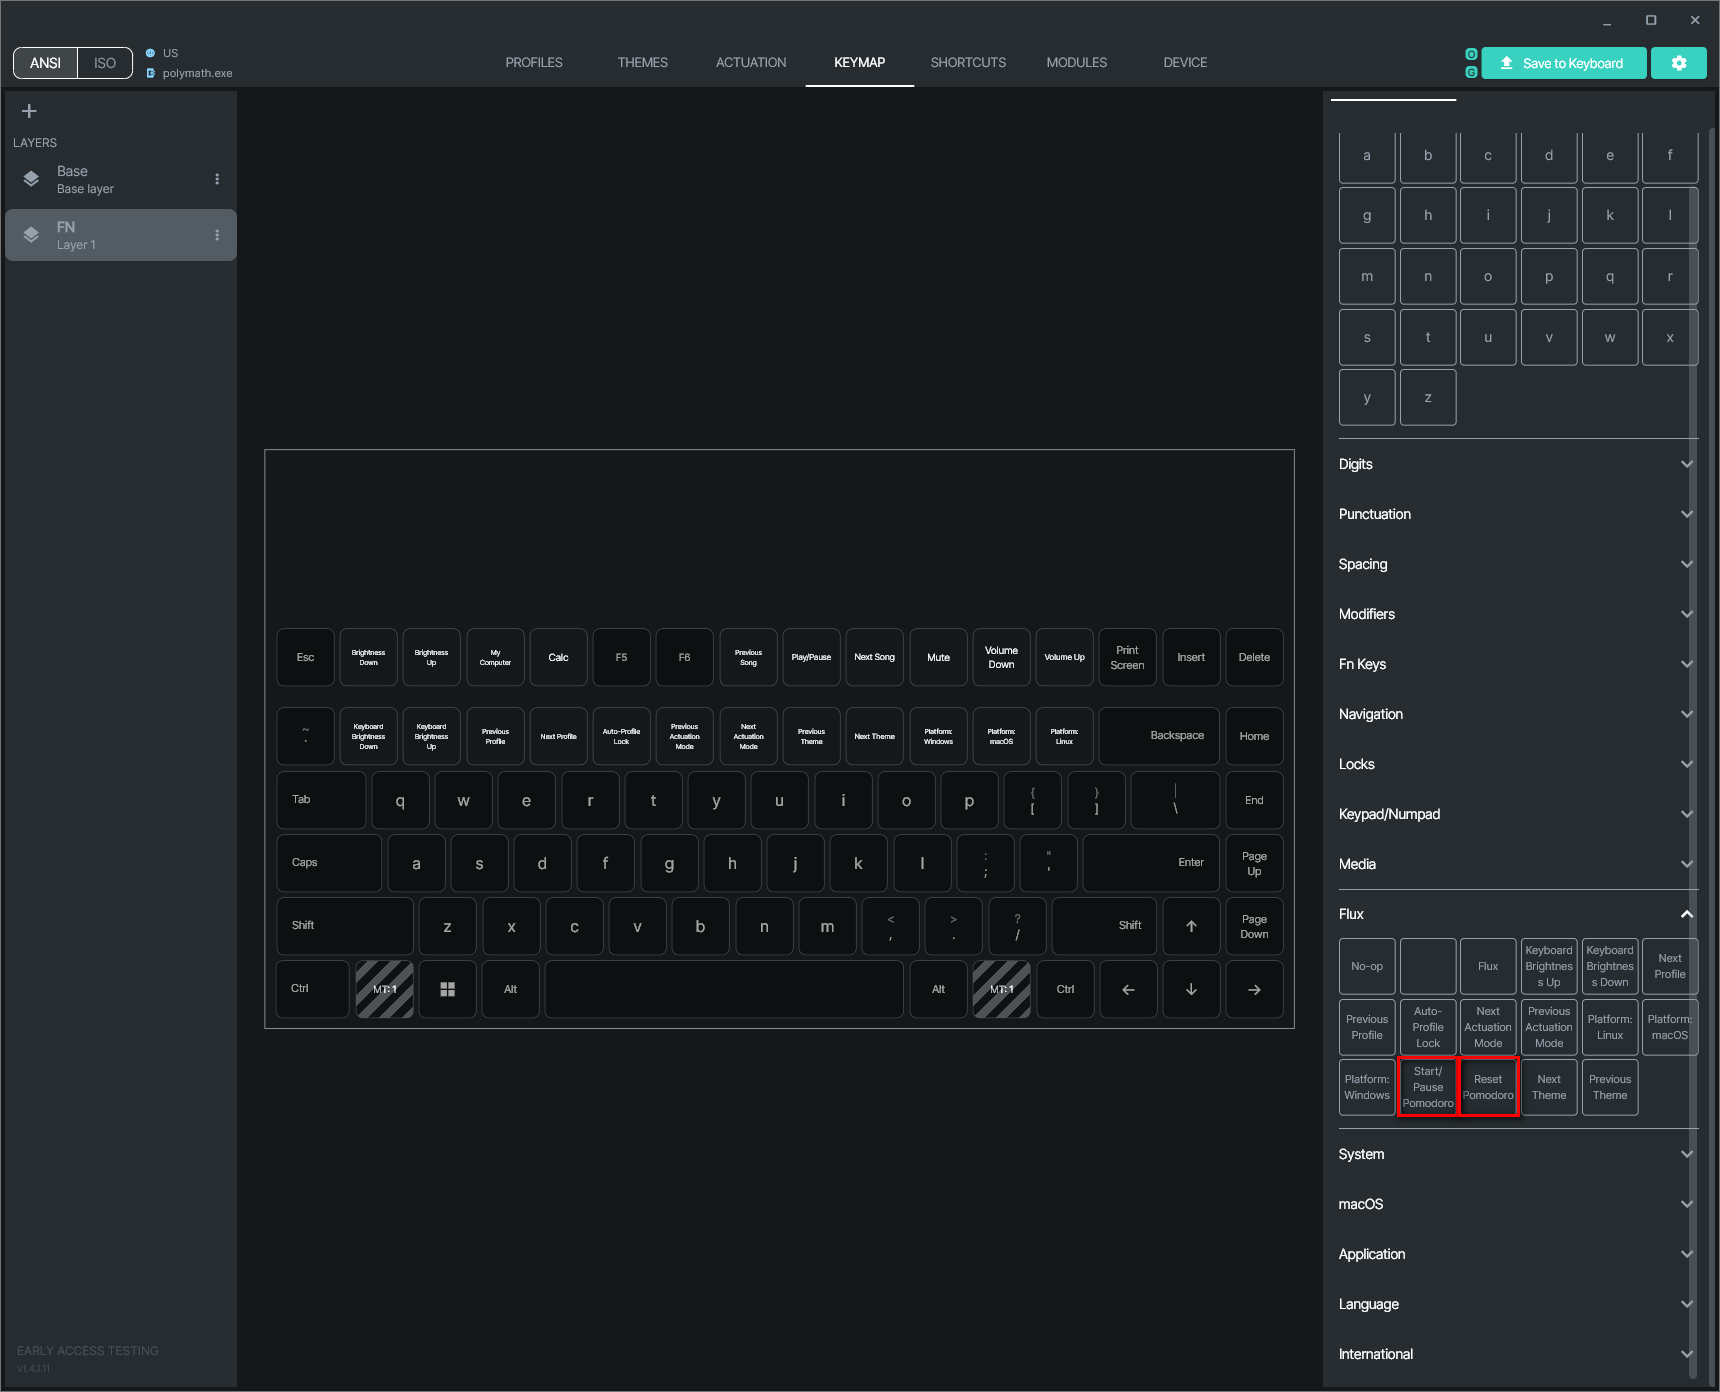
To control the pomodoro timer tile go to the Keymap tab and navigate to the Flux category of characters and assign the Start/Pause Pomodoro and Reset Pomodoro keys to a layer (such as the FN layer) and then press Save to Keyboard. You can then start, pause and reset the Pomodoro timer by pressing these newly assigned keys on your keyboard.
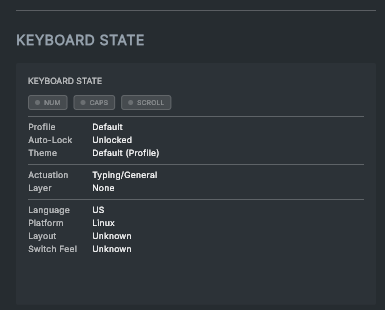
Keyboard state tile
The keyboard state tile shows whether Numlock, Capslock and Scrollock has been activated as well as displaying a number of other pieces of useful information. This tile functions even if Polymath is not running or installed (with the exception of the language detection).
Customisable keymaps and layers
The Keymap tab in Polymath allows you to modify and remap keys on your keyboard.
You can also create new layers and generate a key to switch between different layers.
Layers
Layers allow a keyboard to have multiple key layouts available at the same time. Each layer can assign different actions to the same physical keys.
For example, the W, A, S, and D keys might type these letters on one layer, act as arrow keys on another, or control media playback on a third.
A keyboard always has at least one active layer, usually Layer 0, which serves as the base layer. A Layer Switching Key can be used to temporarily or permanently activate other layers, giving you quick access to additional functions without requiring more physical keys.
Layer switching and layer switching keys
To switch layers, a key can be assigned to change which key layer is currently active on your keyboard. This key can be set in the Layers sidebar within the Keymap tab.
When a Layer Switching Key is pressed, the keyboard activates a Target Layer.
For example, on Layer 0, there is a layer switching key called MT:1. MT1 is targeting Layer 1 and is a Momentary Toggle meaning it will activate Layer 1 while MT:1 is being held down. When MT:1 is released, Layer 0 will become active again.
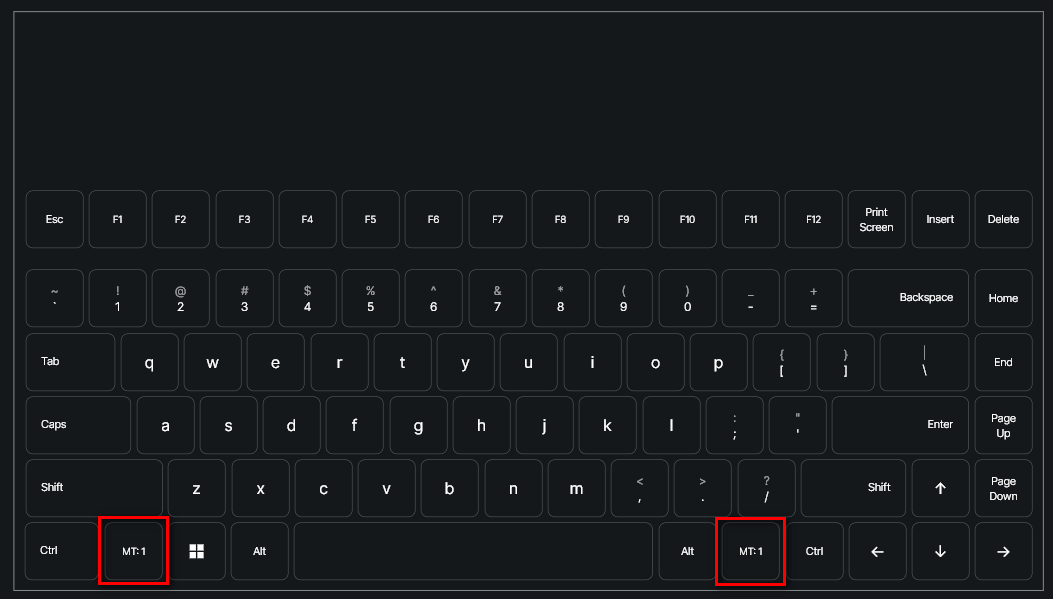
The FN layer
By default, your Keyboard has two layers, a standard base layer for typing (Layer 0) and an FN layer (Layer 1). There are two keys assigned (MT:1) that when held will activate the FN layer on your keyboard.
The FN layer, by default, has a number of different and useful functions including:
- Adjusting display brightness
- Media and volume controls
- Adjusting keyboard brightness
- Keyboard profile switching
- Keyboard actuation mode switching
- Keyboard theme switching
- Switching keyboard OS layout
- Locking the current keyboard profile
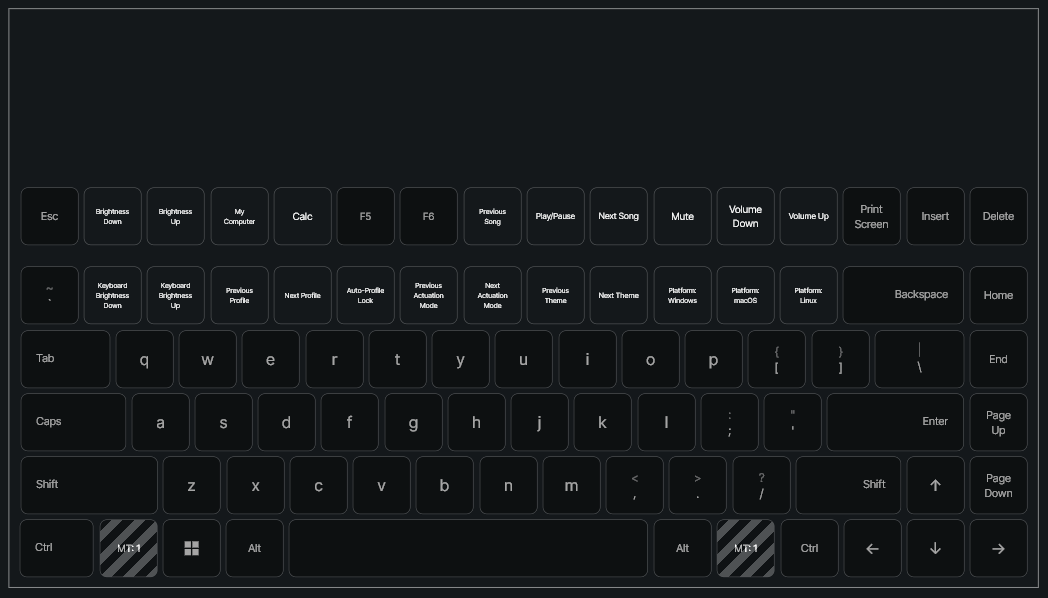
This layer and any other layer can be freely edited or changed in the Keymap tab.
Macros
Macros are available in Keymap under Macros.
Macros are a timed series of key presses and key releases and in Polymath you can bind a macro to a single key that can then be allocated to a layer.
There are two ways to create a macro, by recording key presses or by manually adding each step.
As an example, to open Task Manager on Windows requires Ctrl + Shift + Esc to be pressed. This can be created by adding in key presses and releases for each of these keys:
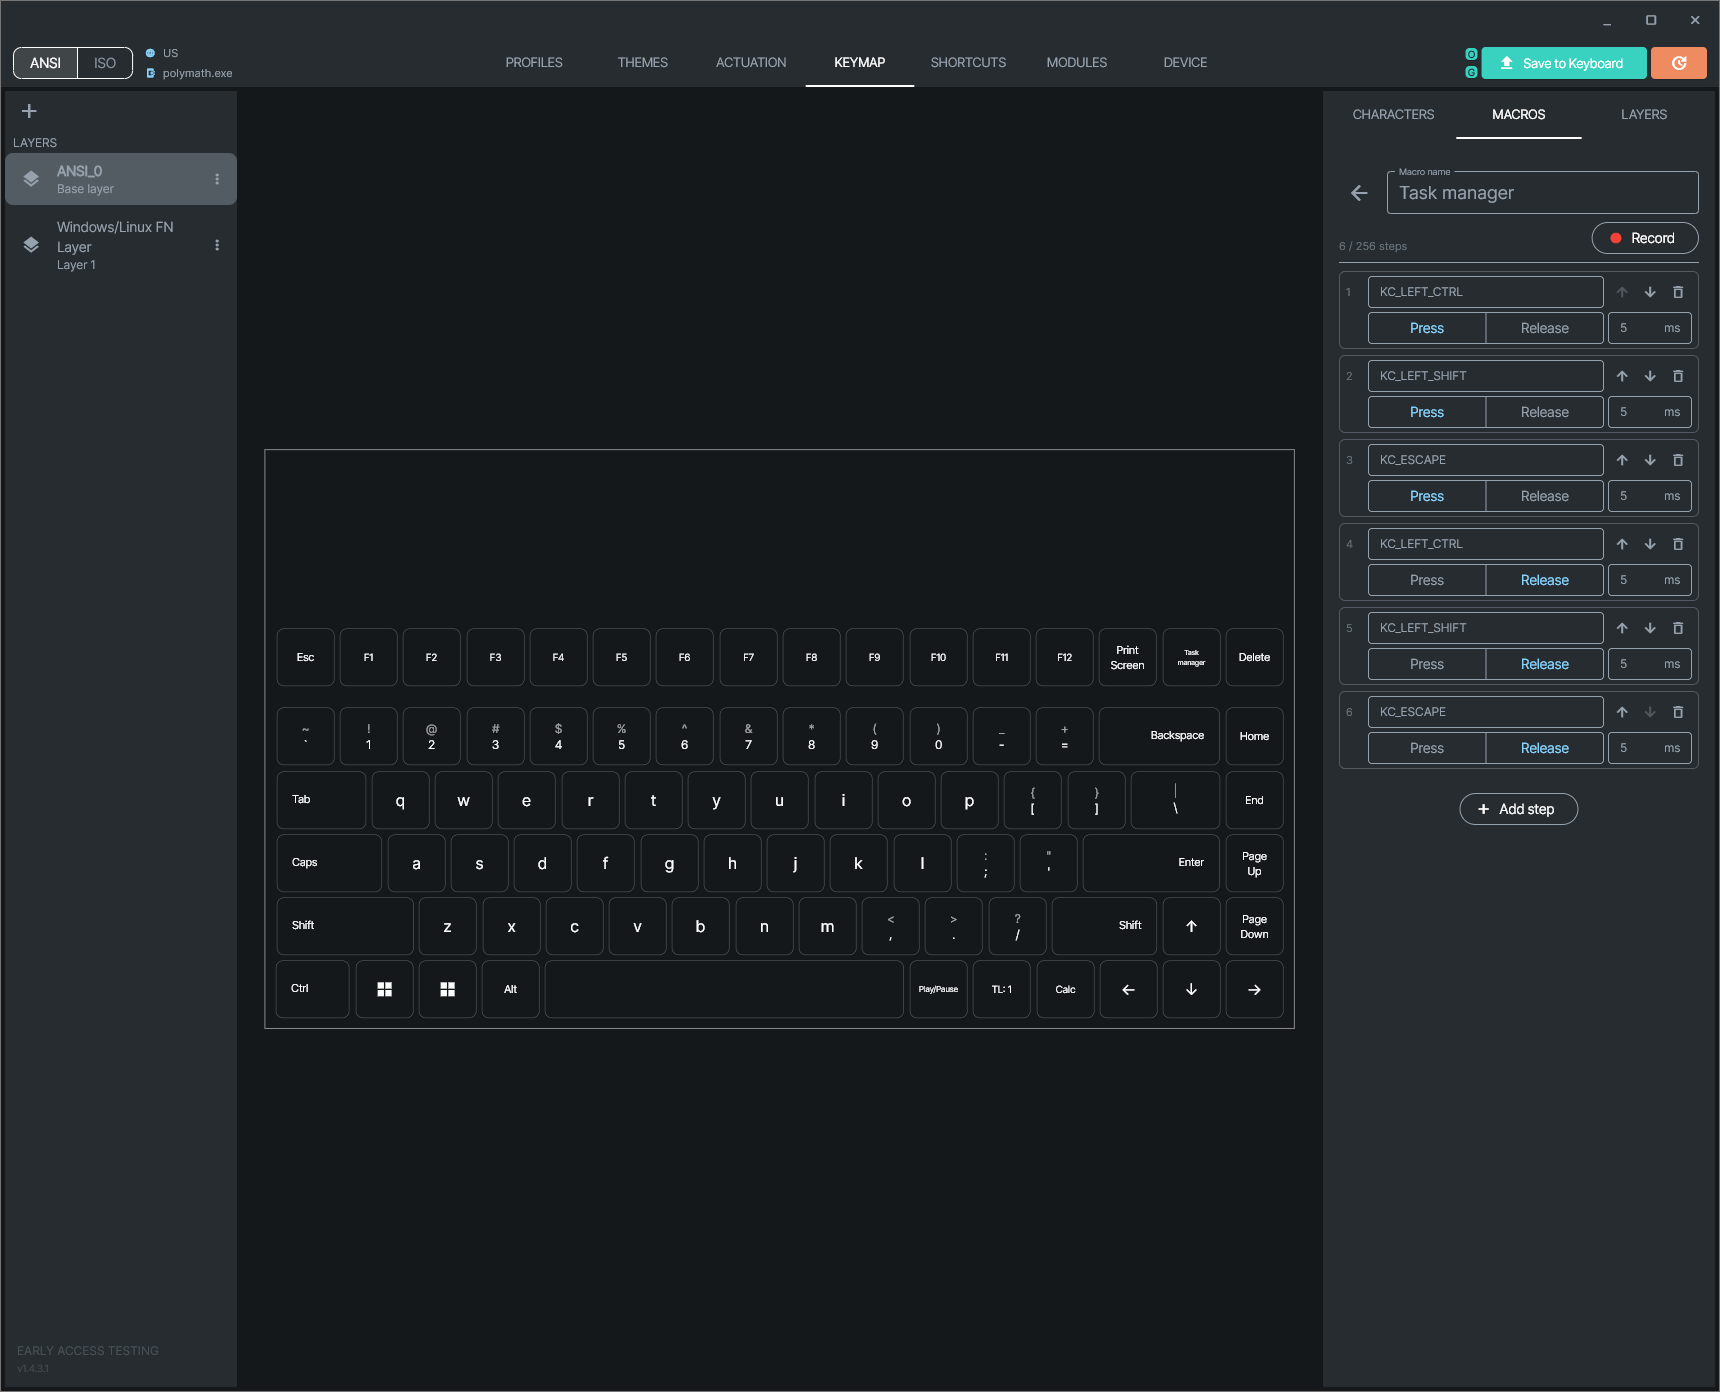
Once you have set up your macro, you can then simply drag and drop the macro on to your desired key on a layer. Pressing that key will then trigger the macro.
Importing and Exporting from Polymath
You can export your configuration by selecting any profiles, themes, actuation settings, keymaps and shortcuts and exporting a .flux file.
You can import that .flux file on to another computer.
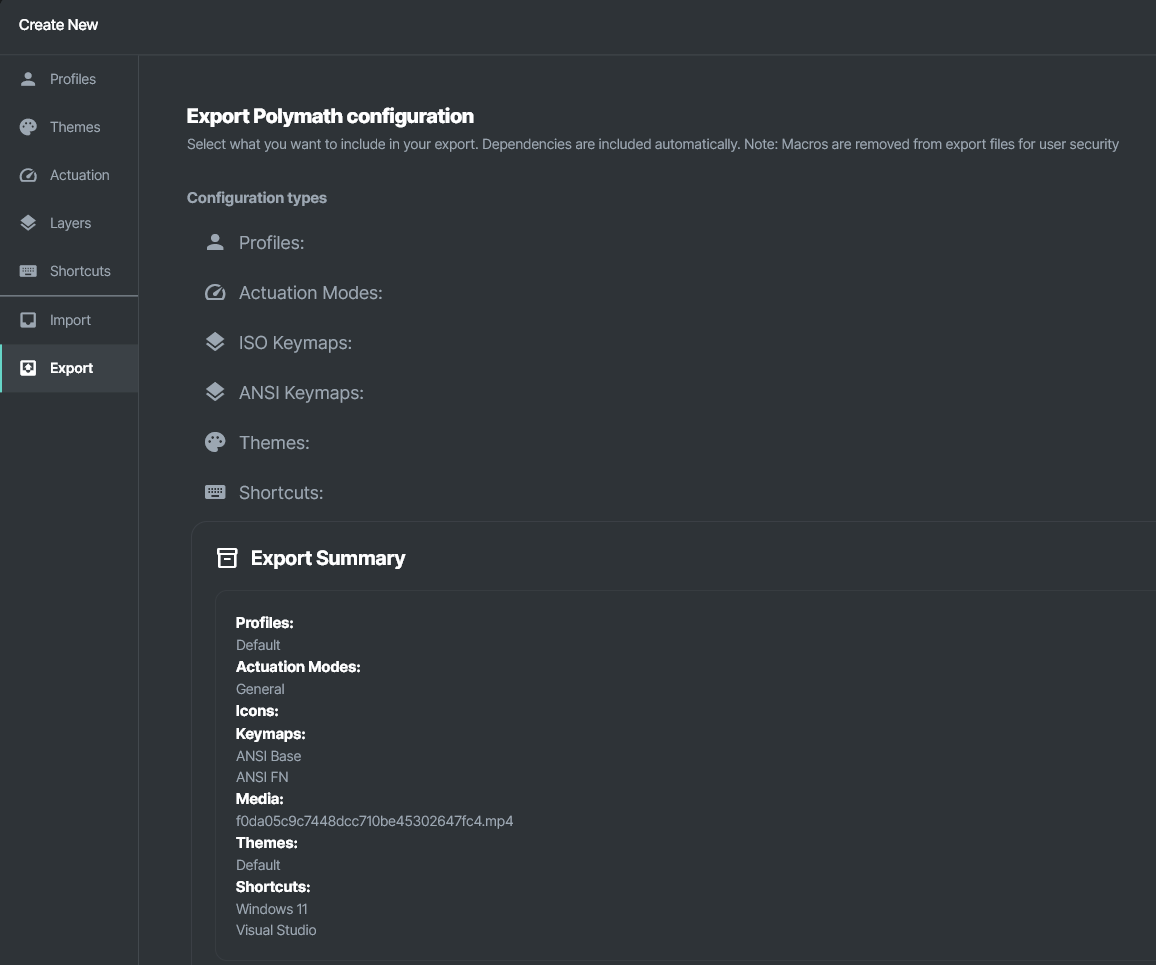
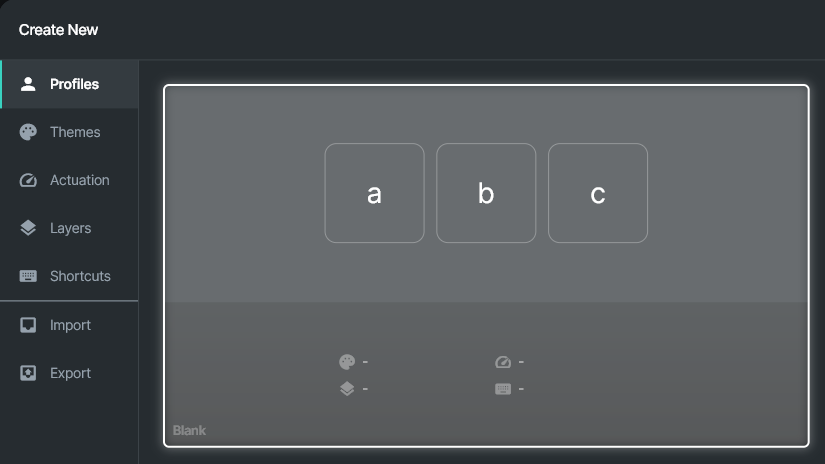
To access these options go to ‘Create New’ (the + symbol in the top left corner of most tabs) and select import or export in the menu.
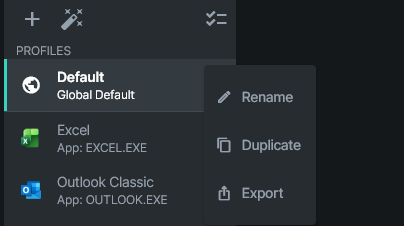
You can also access the export option by opening the menu for an individual item.
Parallax adjustment
Because of the nature of the Flux Keyboard’s keys and the fact no two setups and users are exactly alike, Polymath allows you to make adjustments to fine-tune key display and position to account for seating position, height and angle for best visibility.
This can be accessed in the Device tab.

To get the most accurate results with parallax adjustment you should measure your height to eye level from your desk, the distance between your torso and your keyboard and any amount of horizontal offset from the center of the keyboard.
Settings in Polymath
Polymath language
Polymath is available in English and Japanese.
You can change your language under Settings.
Automatic updates
Polymath, by default, checks once per day for updates. An orange indicator icon will appear in the top right corner if an update is available. This takes you to Settings where you can update Polymath.
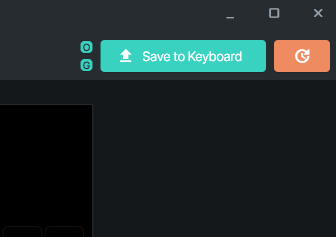
You can also change the frequency of these checks under Settings in Updates.
Flux API
The API is accessed in a tab in the Settings menu in Polymath.
It is not enabled by default. To use the API it needs to be enabled and if permissions are required, these also need to be enabled:
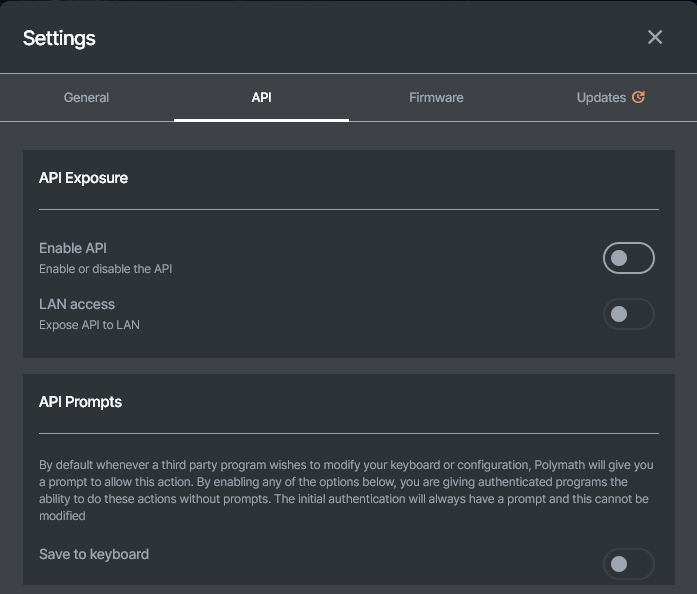
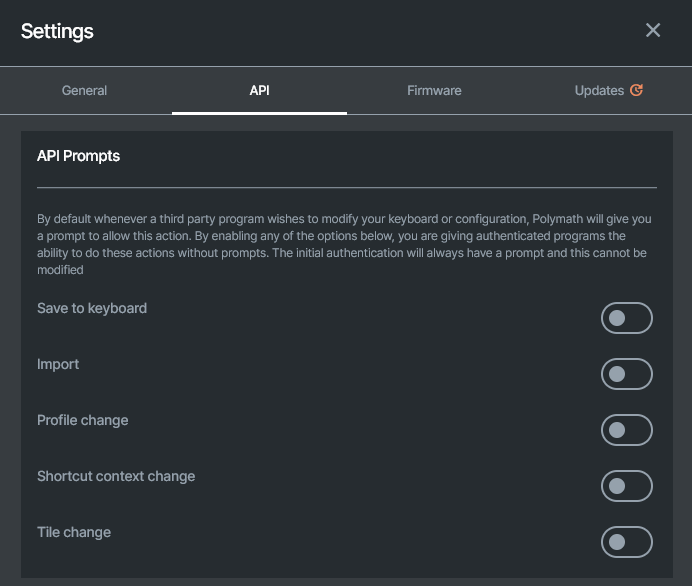
For more information on the Flux API please see our Github page.
Troubleshooting
Sensor calibration at startup
When your keyboard starts up, it takes a few seconds to start up.
At the beginning of this process the keyboard takes a calibration reading of its sensors to record the resting values of each key. Holding down keys or pressing keys during the calibration can skew these values and result in non-triggers/mistriggers of keys during use. To recalibrate, simply power cycle the keyboard by unplugging it and plugging it back in.
Magnetic interference and your keyboard
It is possible for external magnets to interfere with the hall effect sensors of your keyboard. This is because the hall effect sensors are measuring magnetic fields from the magnets in each key and interference can be introduced where there are other magnets in close proximity. This can result in unintended key presses, keyholds and generally unexpected behaviour.
Sources of interference can include magnetic desks like the Secretlab Magnus, wireless chargers, peripherals with magnets in them, phone cases with magnets, etc.
Some mice have magnets in them, which, depending on the strength of the magnets, can cause interference that appears intermittent as the mouse’s proximity changes to the keyboard. Usually this would happen only if the mouse was located very close to the keyboard but this should be considered and eliminated when testing for sources of interference.
Other possible sources can include steel desk frames or parts that are made from ferrous metals which have become magnetised from exposure to magnets. This can happen, for example, when magnetic accessories or attachments have been affixed to those parts.
To check if the desk area may have interference, try plugging in your keyboard in a different location ideally with a different setup and without the same mouse/peripherals. This will allow it to calibrate in an interference-free environment and can then be tested for unexpected behaviour.
It is possible to resolve interference issues simply by creating distance from the suspected source of interference and moving your keyboard or the object causing the interference.
If the interference is coming from the surface that the keyboard is resting on, options include using the keyboard’s flip out feet, placing a desk mat or pad underneath the keyboard or adding some other surface beneath the keyboard. The means of separation (air, cloth or solid object) does not matter – rather the amount of distance is what is important and in some cases a few millimetres of separation may be adequate to enable accurate sensor calibration.
Polymath log files
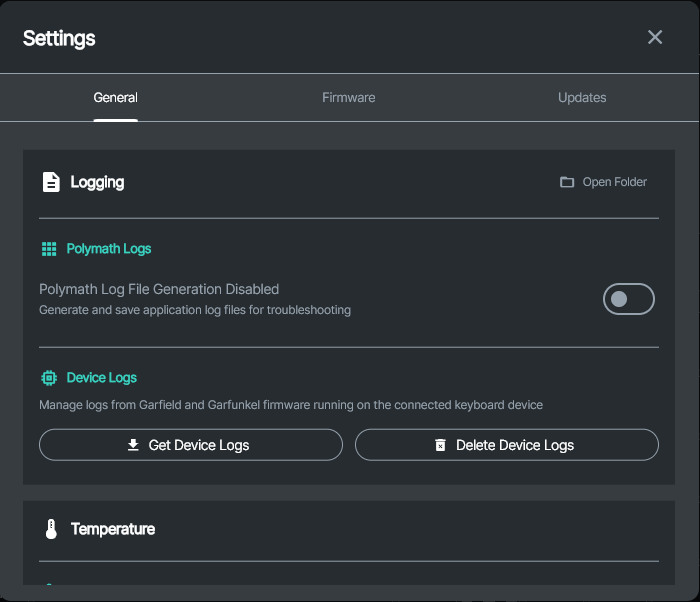
Polymath automatically keeps logs from the last 10 launches to assist with debugging and troubleshooting. These files are kept locally on your computer. This can be disabled in Settings.
You can locate the log files in Settings by clicking Open Folder under Logging.
For Windows and MacOS, these files are generally under: username\documents\flux\logs
For Linux: home/flux
The log files are named starting from most recent to oldest:
polymath.log
polymath_1.log
polymath_2.log
polymath_3.log
etc.
Device log files
For some troubleshooting cases, you may be asked to obtain device logs. This can be done in Settings and clicking Get Device Logs under Logging which will import the device logs from your keyboard to your logs folder which can be accessed by going to Open Folder.
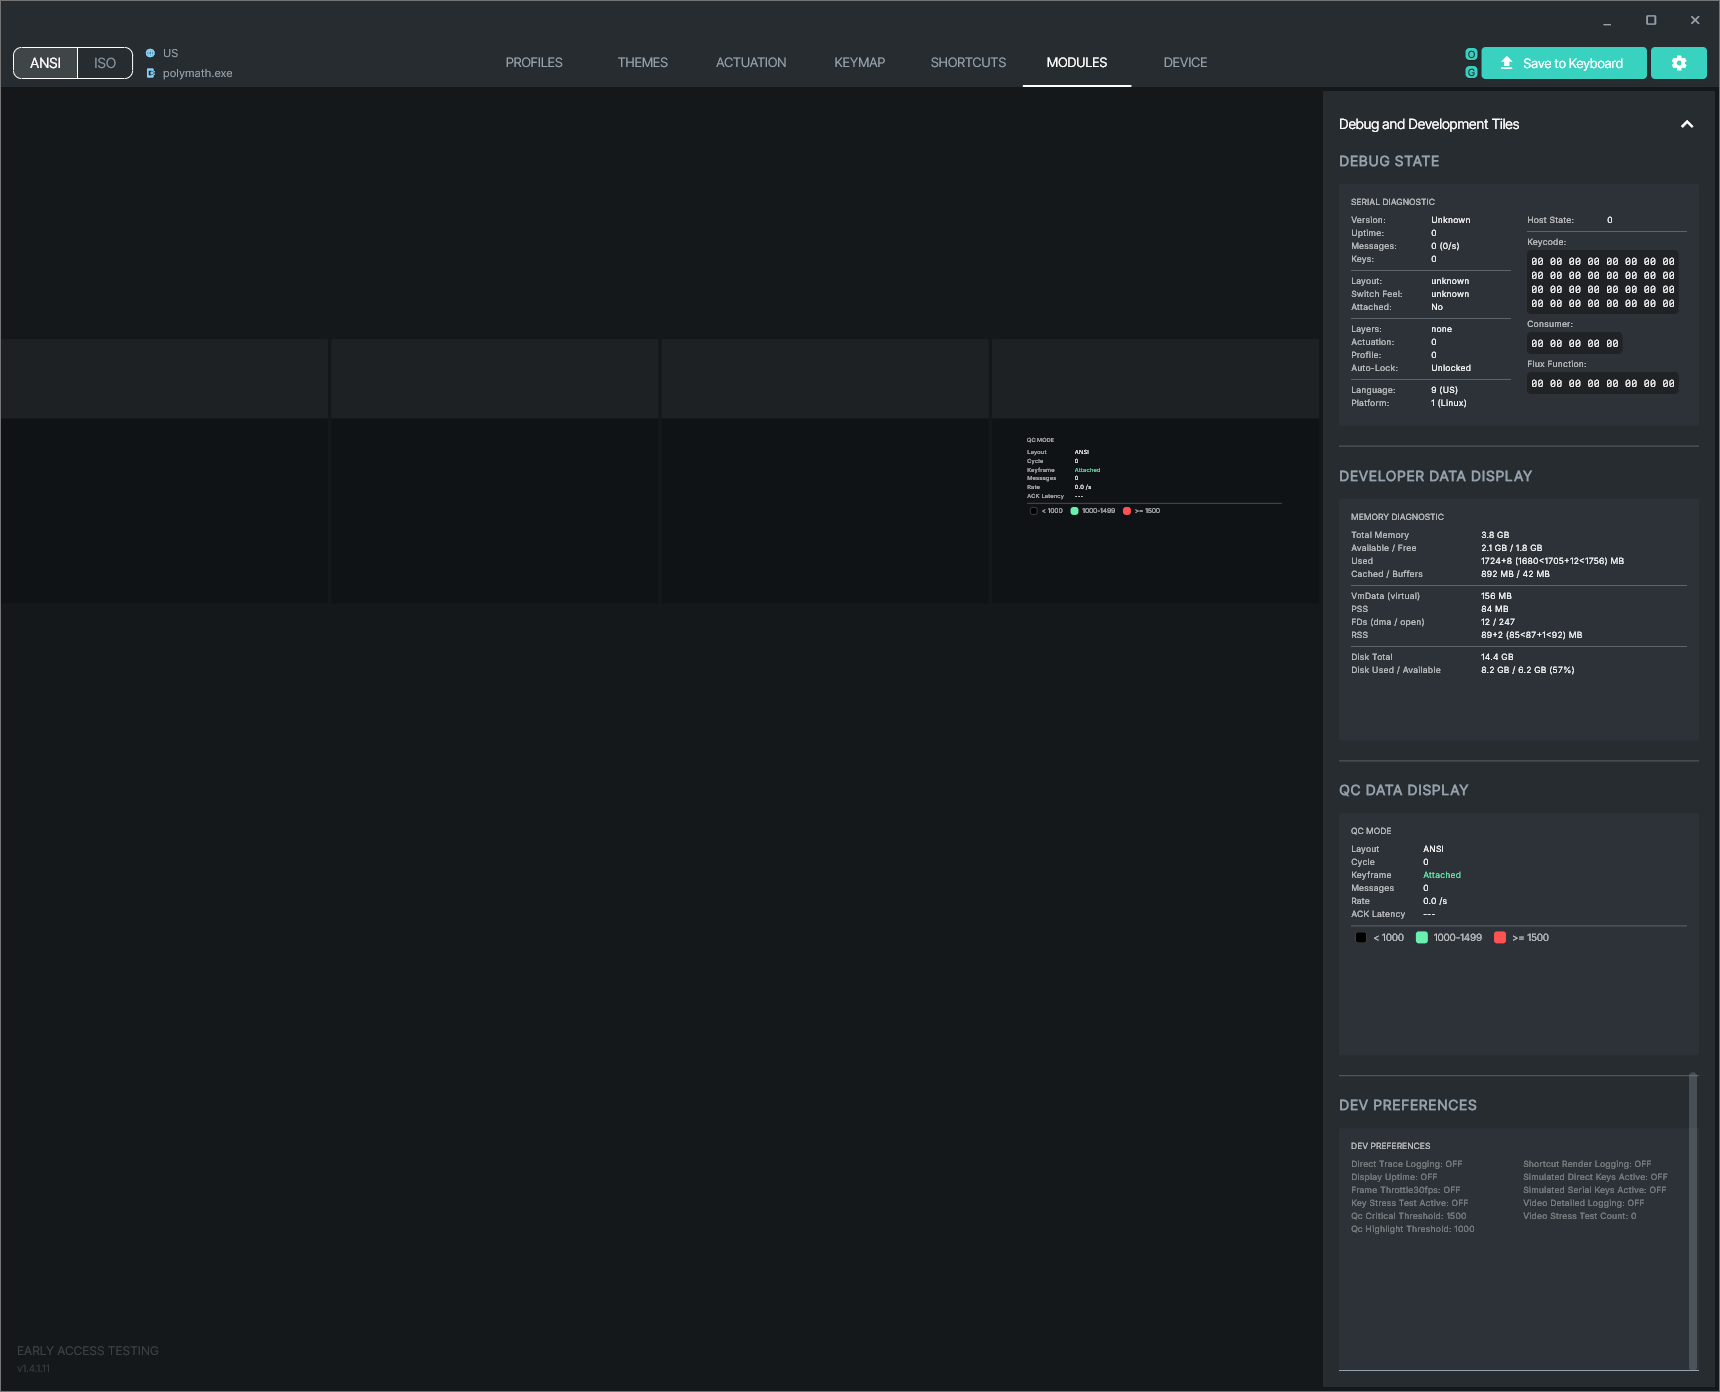
QC mode tile
QC mode is used to visually display sensor readings of the keyboard for troubleshooting.
To activate QC mode, in the Modules tab, scroll to Debug and Development Tiles and drag the QC Data Display tile on to any tile slot and then press Save to Keyboard.
With QC mode activated, when you press a key, it will show a sensor reading live on the key itself.
To deactivate QC mode, simply drag and drop No Tile or any other tile on to the QC Data Display tile to overwrite it and press Save to Keyboard.
Support
Please contact info@fluxkeyboard.com for help.
You can also contact us on our Discord server for help and software or hardware support, bug reporting or to make a feature request.
Keyframe maintenance
DO NOT USE ALCOHOL OR ALCOHOL-BASED PRODUCTS FOR CLEANING
- The top surfaces of the keyframe can be wiped with a lint-free microfibre cloth or with an air duster/blower
- If needed, carefully wipe the underside of the keyframe. The underside of the keys should only be wiped gently to avoid dislodging them from the keyframe
- If required a damp cloth or water can be used to clean the keyframe while removed from the base. Allow to dry completely before reattaching
- Avoid leaving in direct sunlight as prolonged UV exposure may degrade materials over time and cause discolouration
Products containing these chemicals should NOT be used for cleaning:
- Any chlorine-based cleaner, such as bleach
- Peroxides (including hydrogen peroxide)
- Solvents such as; acetone, paint thinner, benzene, methylene chloride, or toluene
- Ammonia, such as Windex
If you are instructed to remove and replace an individual key, the correct method is demonstrated here.
Keyboard hardware specs
| Display |
|
| Hall Sensor Resolution | 0.1mm |
| Response time |
|
| Polling Rate | 1000hz |
| Key-roll over | NKRO |
| Embedded SOC | Quad-core ARM processor |
| Onboard Storage | 8GB |
| OS Compatibility |
|
| Connectivity |
|
| Included Cables |
|
| Power | 5V 1.5A min (Recommended 5V 3A) |
| Power consumption | 4 – 6.5W typical |